RAGFlow
This application is modified based on RAGFlow. GenAI Studio encapsulates the core of RAGFlow and provides a complete user interface, helping enterprise teams build enterprise-grade intelligent knowledge bases and Q&A systems without writing any code.
The core advantage of RAGFlow lies in its fine-grained document parsing capabilities. For PDFs, scanned documents, or tables with complex layouts or contents, it not only recognizes the document structure and preserves semantic integrity but also significantly improves the accuracy of retrieval and Q&A, avoiding the issue of missing answers caused by rough text chunking in traditional RAG.
Installation
Like other applications within GenAI Studio, to install RAGFlow, you must obtain
the installation file (the filename is ragflow-App_v1.0.0_setup.run, approximately 5GB).
After getting the installation file, execute the command:
chmod +x ragflow-App_v1.0.0_setup.run && ./ragflow-App_v1.0.0_setup.run
Then, follow the installation steps to complete the deployment.
The filename of the installation file includes the version number, which may
differ from the filename in the above description, such as ragflow-App_v1.1.0_setup.run.
Getting Started
Acquire Token from GenAI Studio
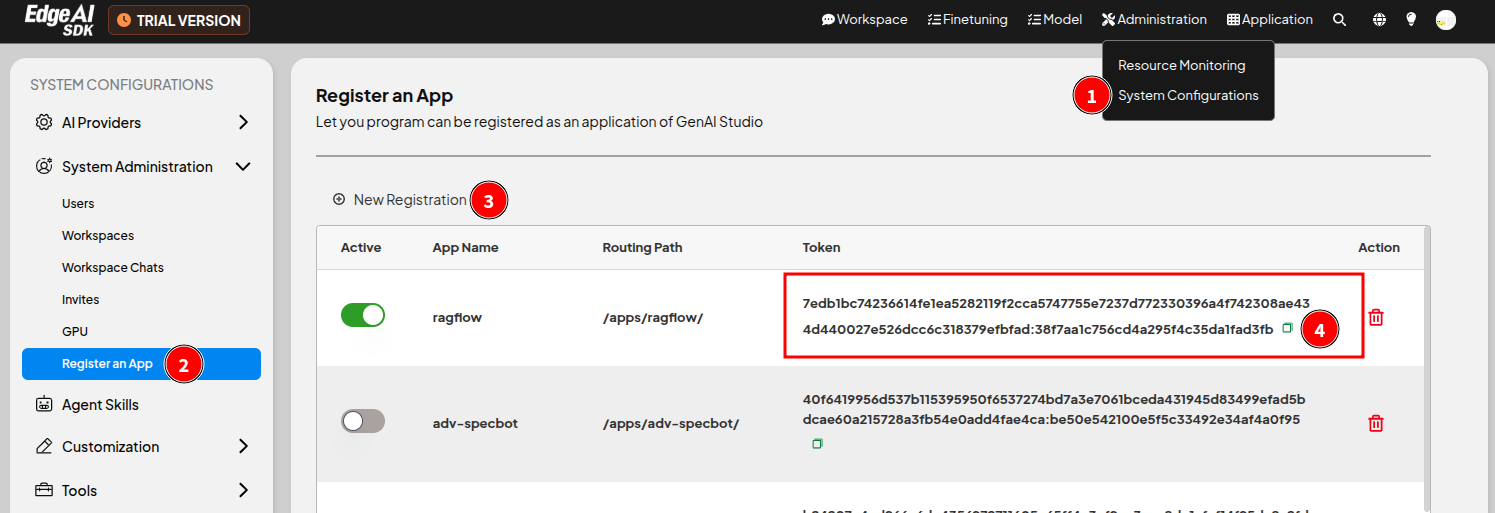
First, register this application in GenAI Studio to acquire a dedicated token:
- Log in to GenAI Studio.
- Click the menu in the upper right corner of the page Administration > System Configuration to open the System Configuration page.
- In the sidebar, click System Administration > Register an App to enter the Register an App page.
- Click ㊉ New Registration, enter ragflow in the opened window, and click Confirm.
- Record the dedicated token for this application for later use.
Modify Configuration File
The configuration file for this application is located at
$HOME/Advantech/GenAI-Studio-Apps/ragflow-App/etc/config.ini. Open this file
using your preferred text editor, modify the [gais] section, and enter the
key obtained in the previous step into the token setting, as follows:
[gais]
host = server
port = 3001
protocol = 1.0
token = <The obtained key>
Start Application
After modifying the configuration file, execute the following commands to start the application:
cd ~/Advantech/GenAI-Studio-Apps/ragflow-App/bin
./app-up
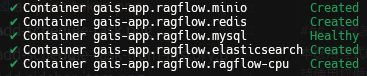
Subsequently, the status of each container within the application will be
displayed on the terminal screen. If their status is Started or Healthy,
it means everything goes well.
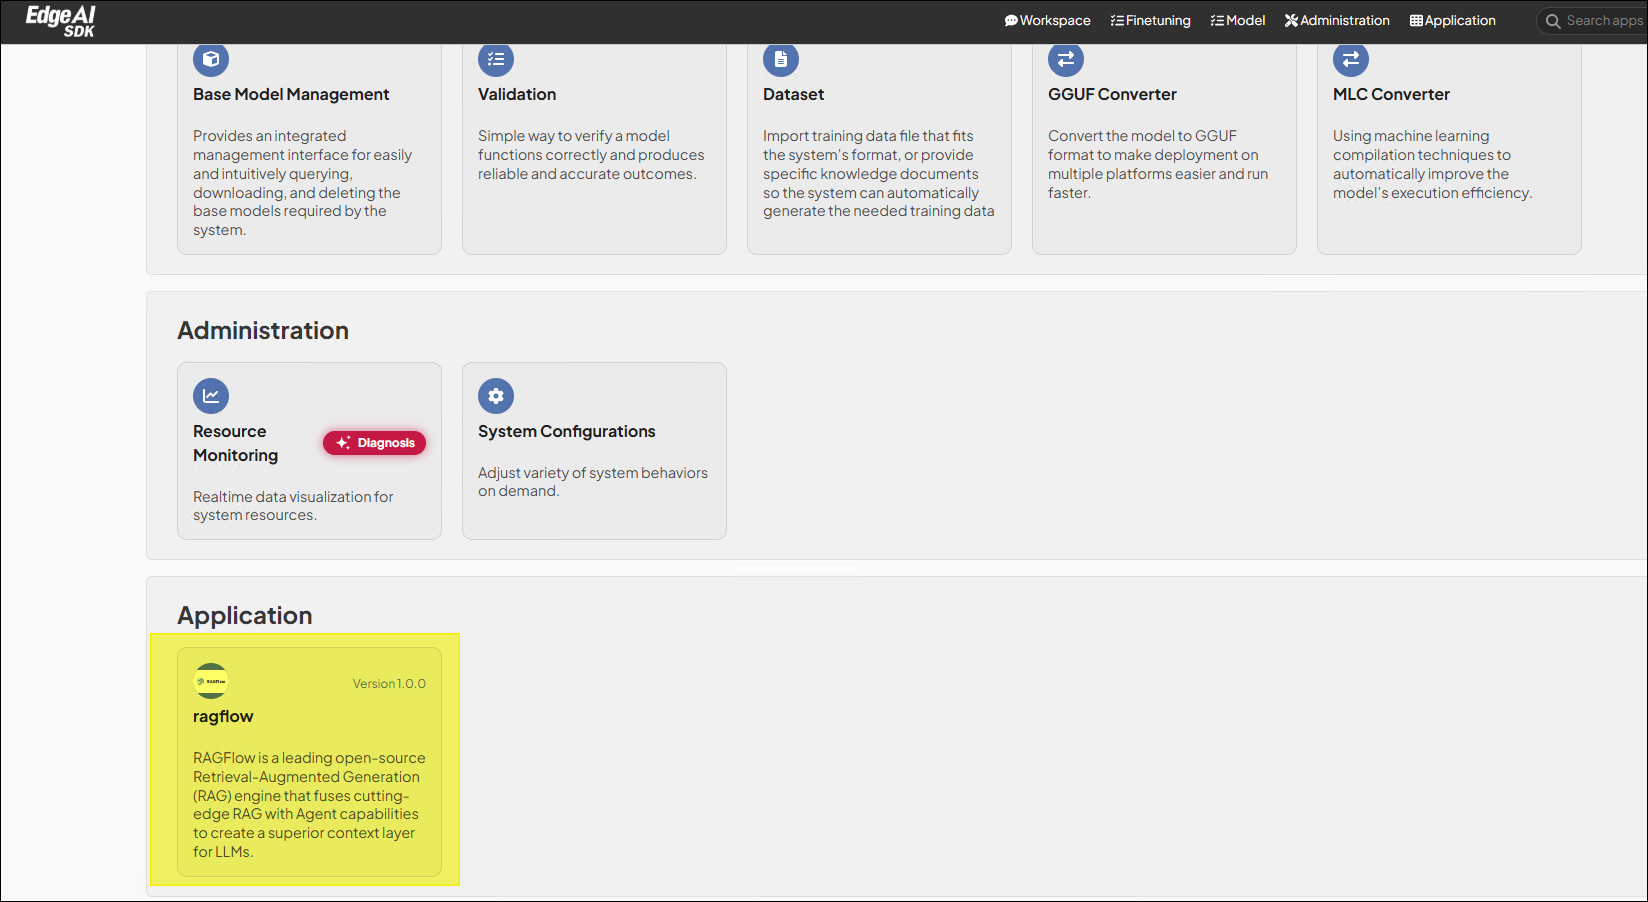
Due to the longer initialization time of this application, after about 5 ~ 15
minutes, an additional feature card representing this application will appear
in the Application category on the GenAI Studio homepage. Click the card to
enter the RAGFlow application.
The application initialization time varies depending on the hardware equipment; please wait patiently.
If your hardware has a high-performance NVIDIA GPU, it is recommended to run
this application in GPU mode for better performance. Add the -gpu parameter
with app-up to run this application in GPU mode.
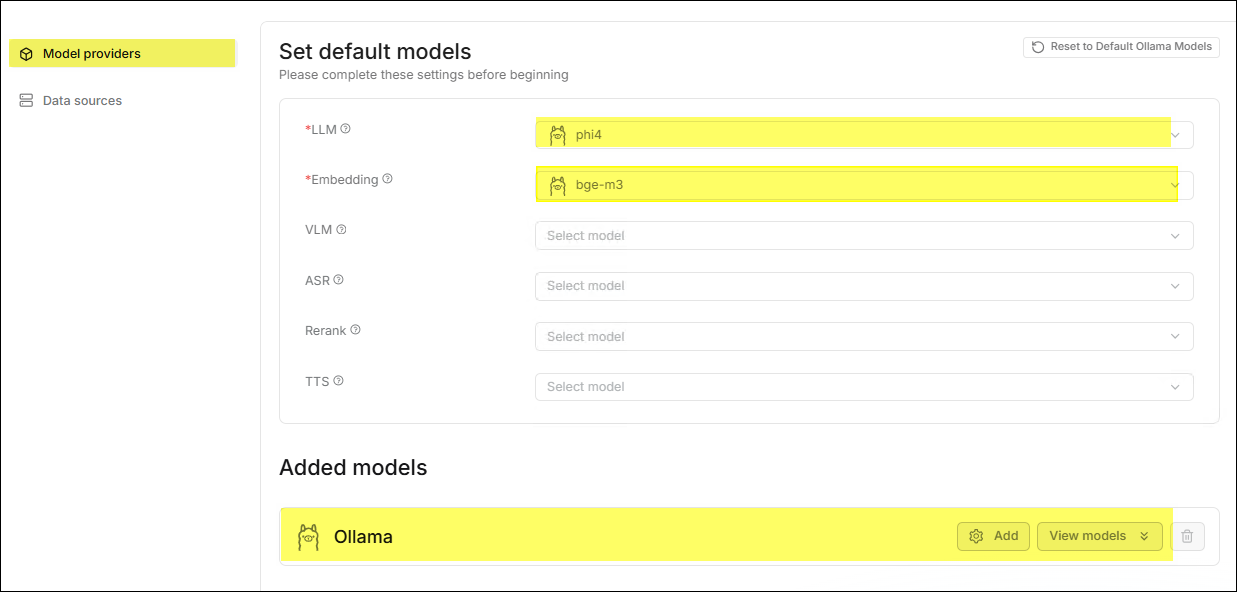
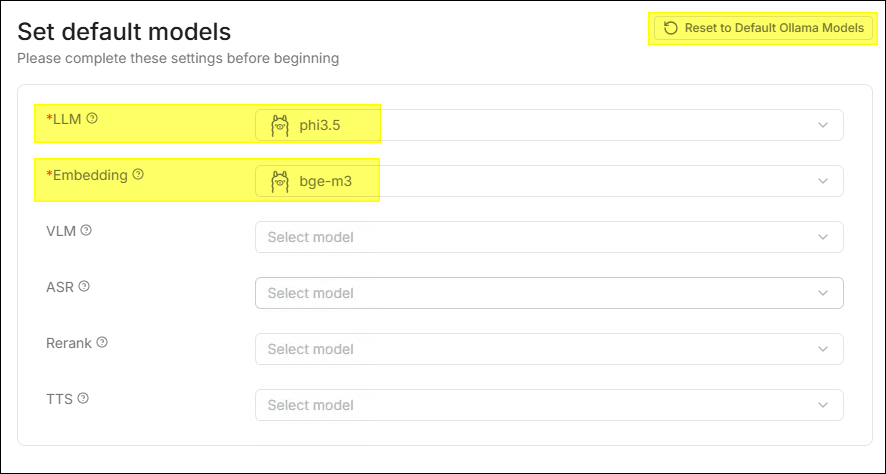
Configure LLM
As a RAG engine, the application's backend also needs a Large Language Model to act as the brain to provide relevant features.
-
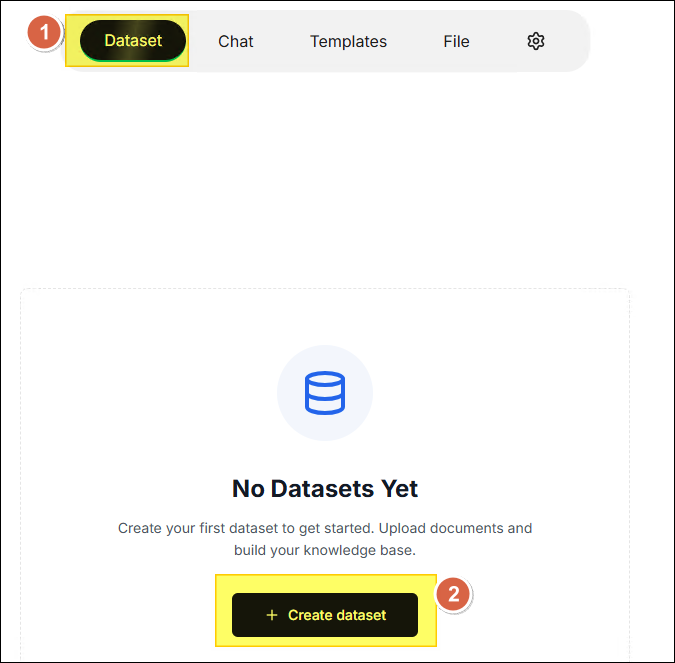
After entering the application homepage for the first time, click ✚ Create dataset.
-
Since the system has not yet configured the LLM and Embedding models, a warning window will automatically pop up. Click the OK button.

-
The system automatically directs to the settings page and synchronizes the models used by Ollama in GenAI Studio.
Create the First Dataset
-
Click Dataset in the horizontal menu at the top of the page, then click ✚ Create dataset.
-
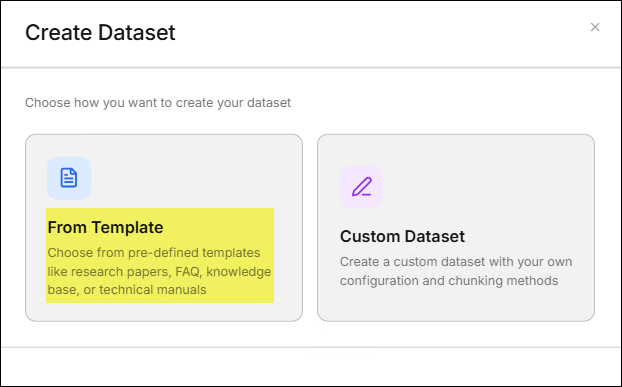
Create Dataset
The application provides two ways for users to create a dataset.- From Template
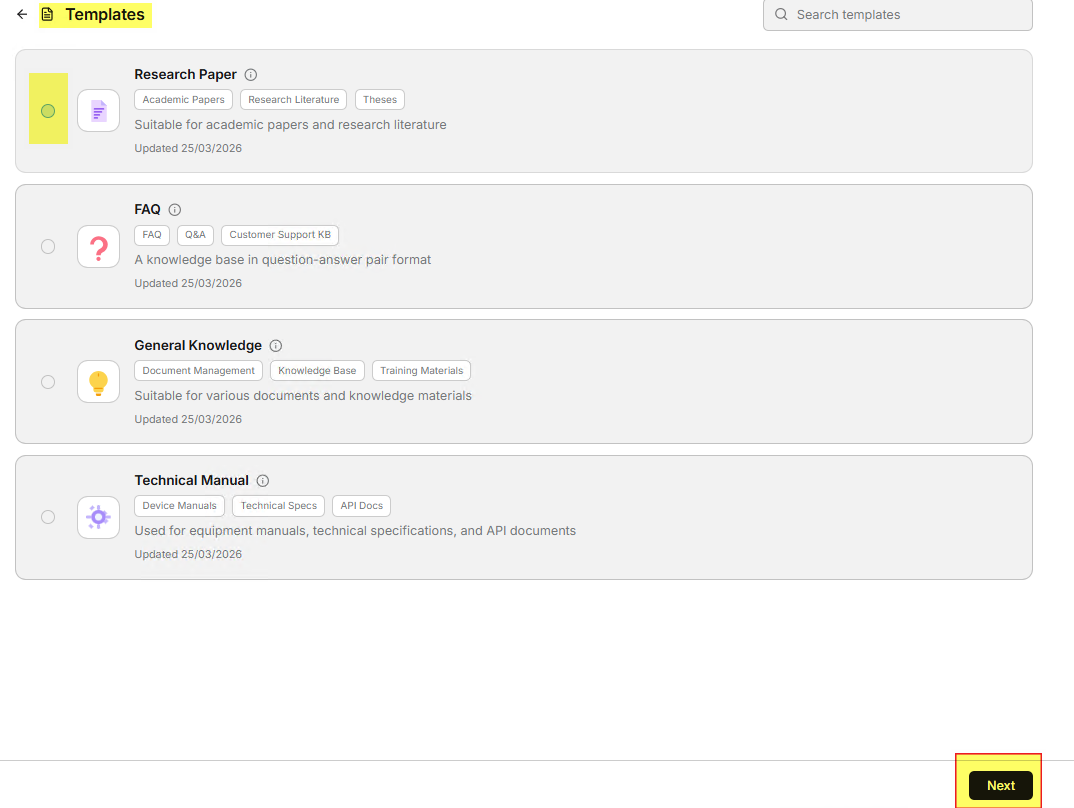
- Click the From Template feature card.
- Select the template that best meets your needs from the template list,
then click Next.
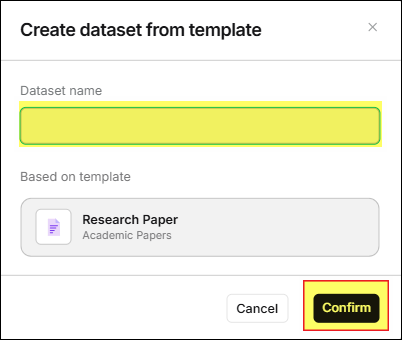
- In the Create dataset from template window, enter the Dataset name
and click the Confirm button. The page will jump to the Files page.
- Click the From Template feature card.
- Custom Dataset
- Click the Custom Dataset feature card.
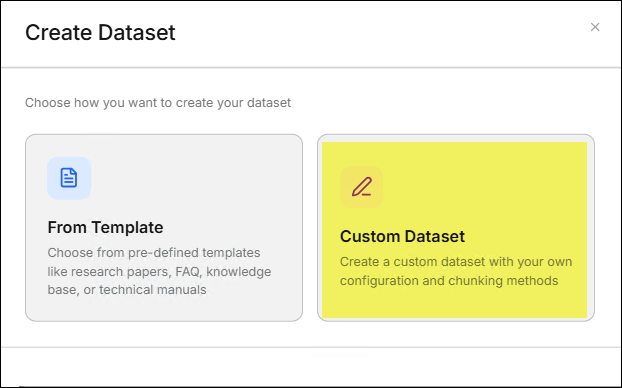
- In the Custom Dataset window, enter the Name and Chunking Method,
then click the Save button. The page will jump to the Files page.
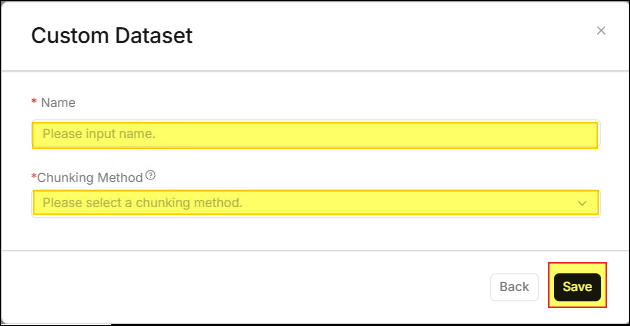
- Click the Custom Dataset feature card.
- From Template
-
Upload Files
After entering the Files page, click Upload file to open the Upload file window. Drag and drop the file you want to upload to the center of the window to complete the upload process.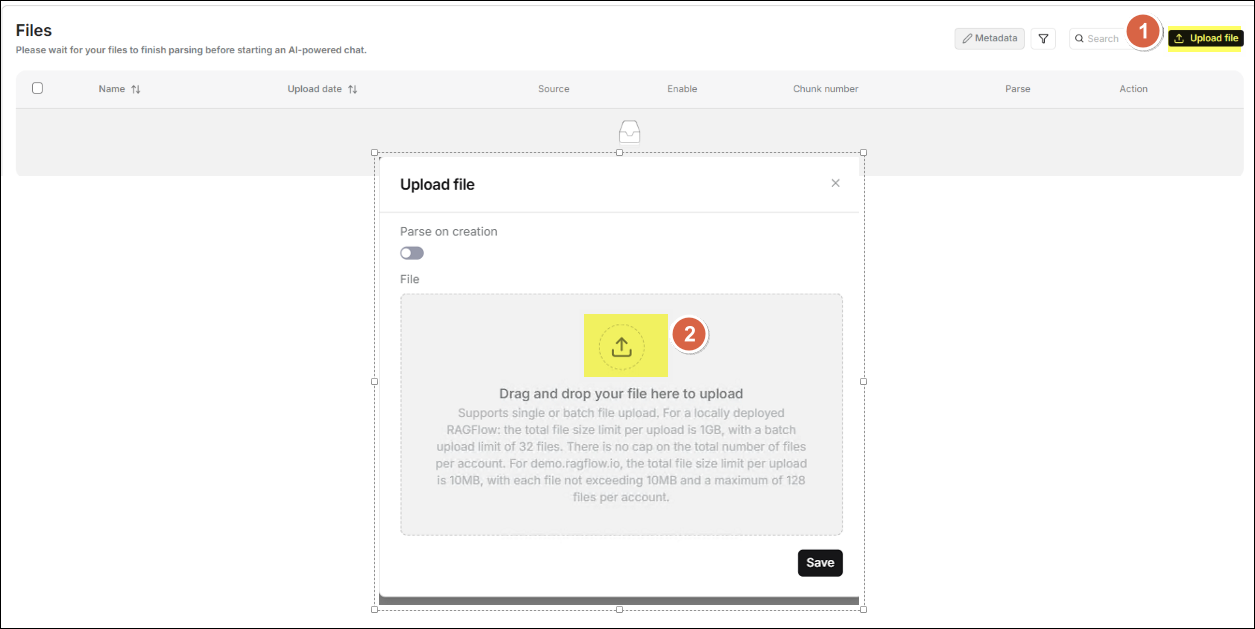
-
The Files page will display the file you just uploaded. Click the corresponding ▶️ button for the file to start parsing the document.

-
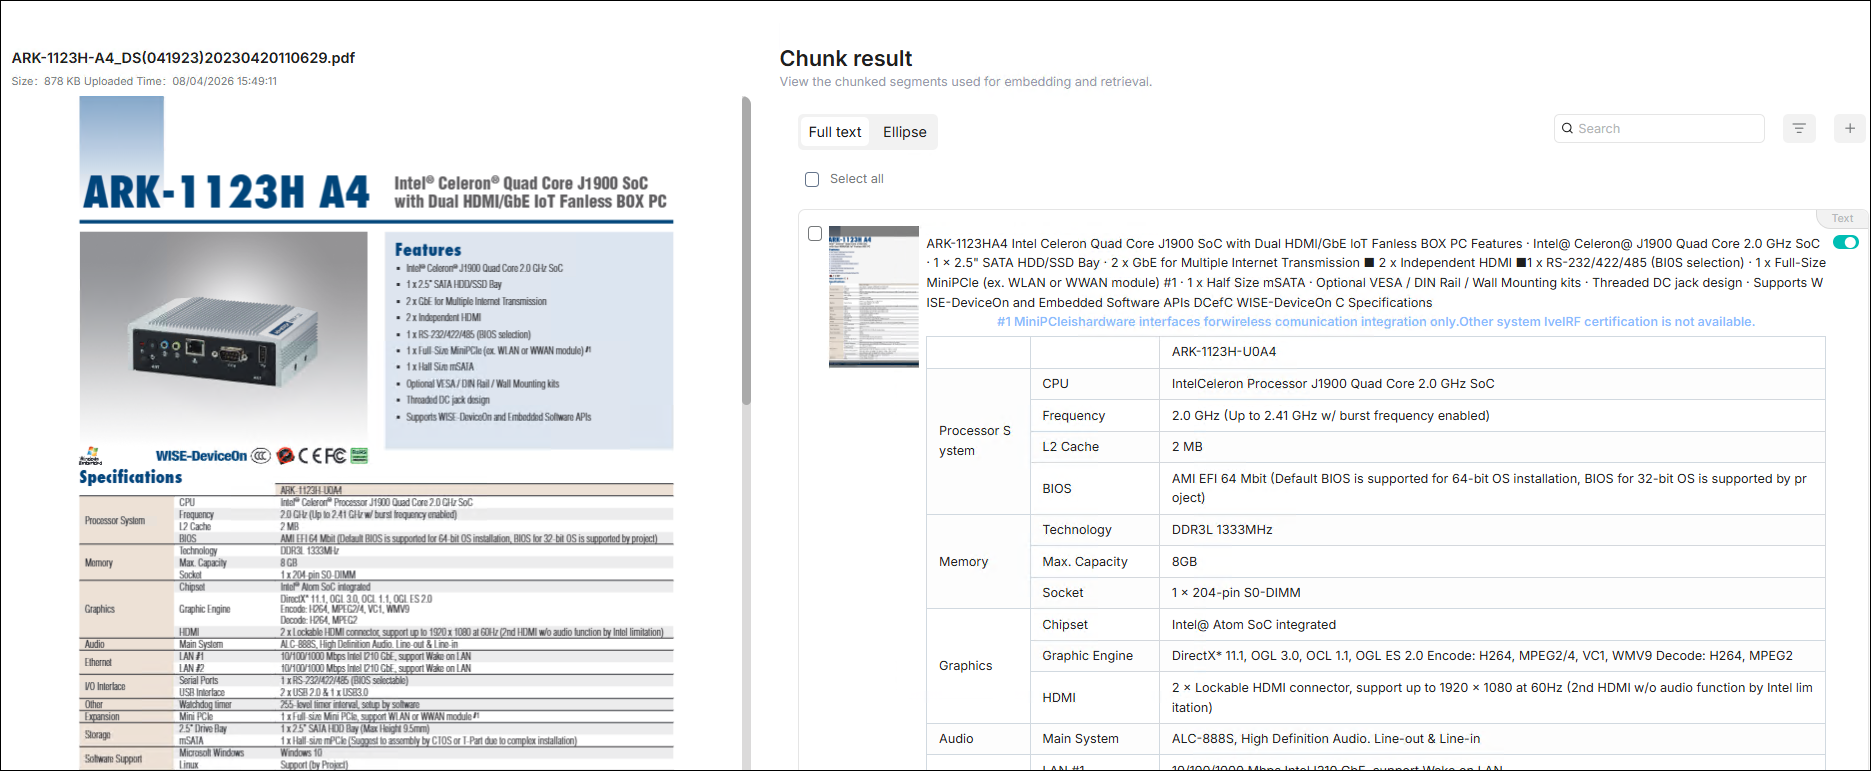
Click the file to view the parsing results.
-
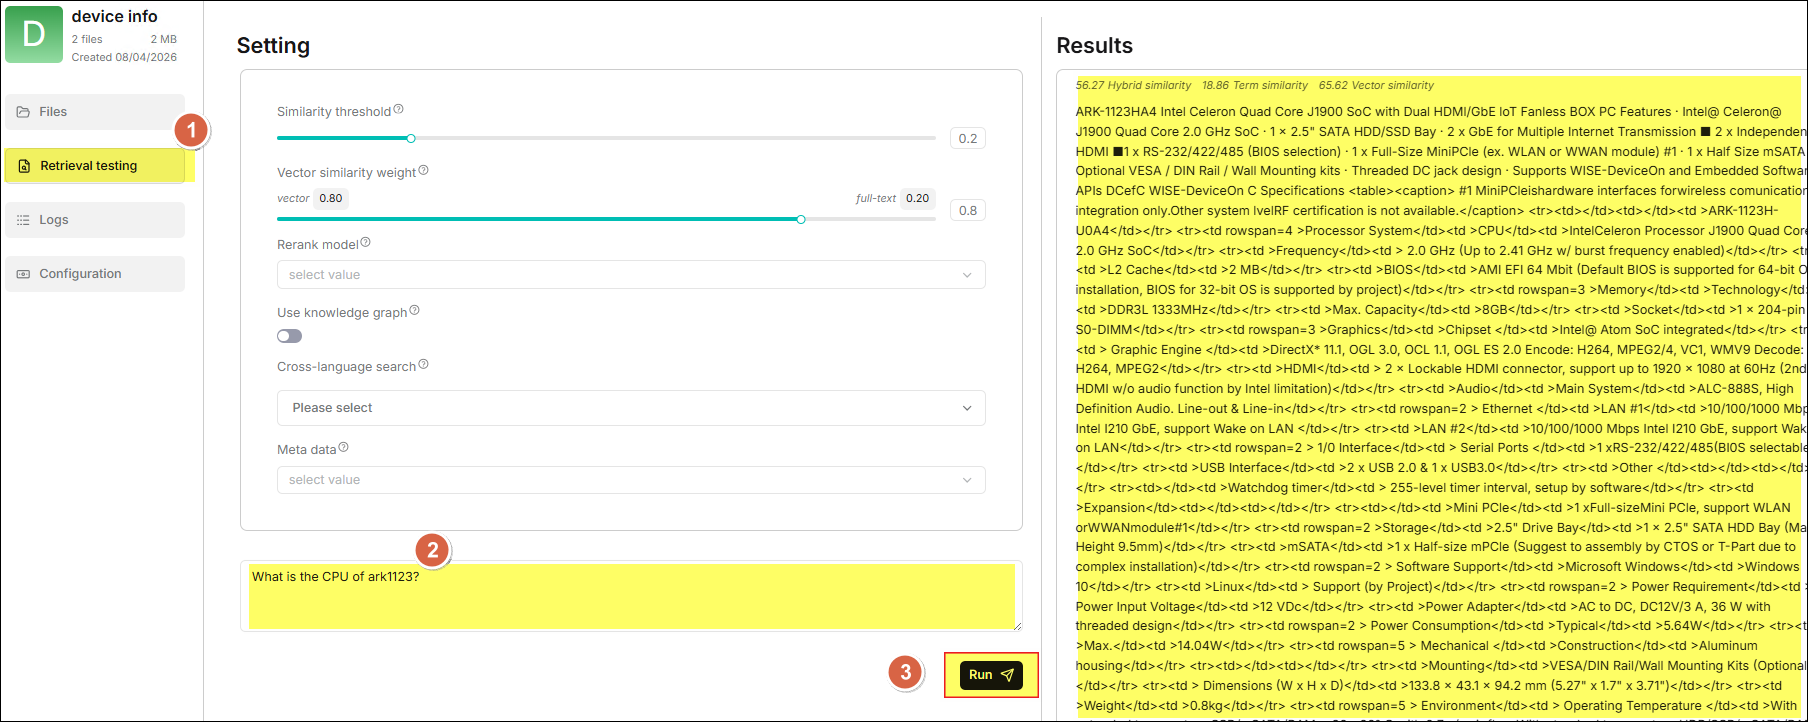
Click Retrieval testing in the sidebar to ask questions to confirm whether your dataset settings meet expectations.
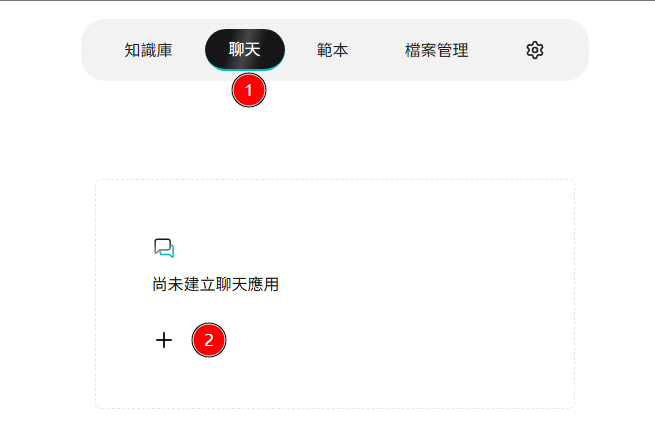
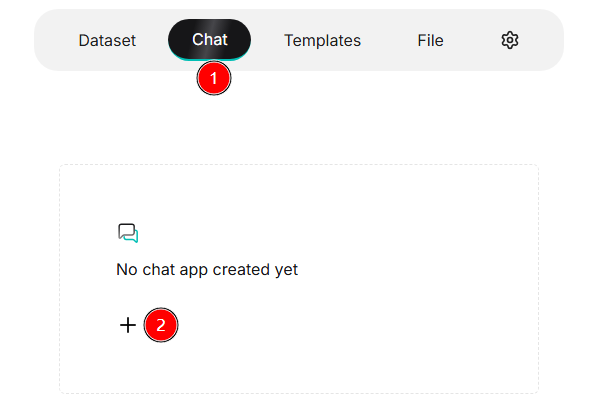
Create the First Chat
-
Click Chat in the horizontal menu at the top of the page, then click ✚ on the feature card below.
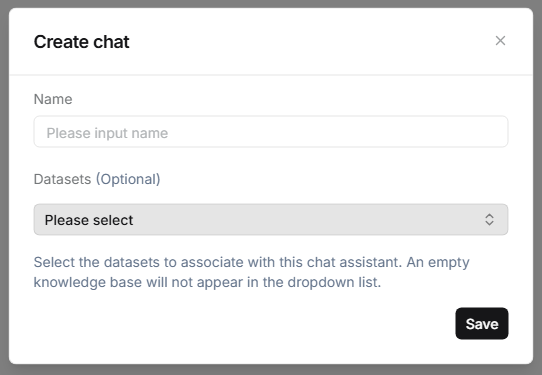
-
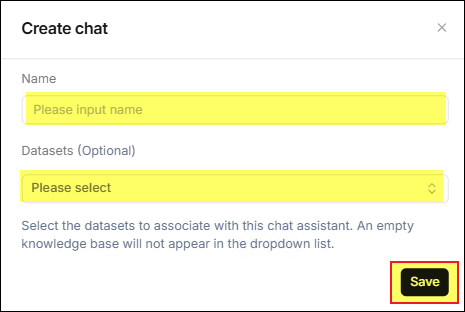
In the opened Create chat window, enter the name you want to use, select the Datasets to be used for the chat app, and click the Save button.
-
The Chat list will display a feature card corresponding to the newly created chat. Click this card to enter the chat. If necessary, click Chat setting at the bottom left of the page for more detailed settings according to actual needs.
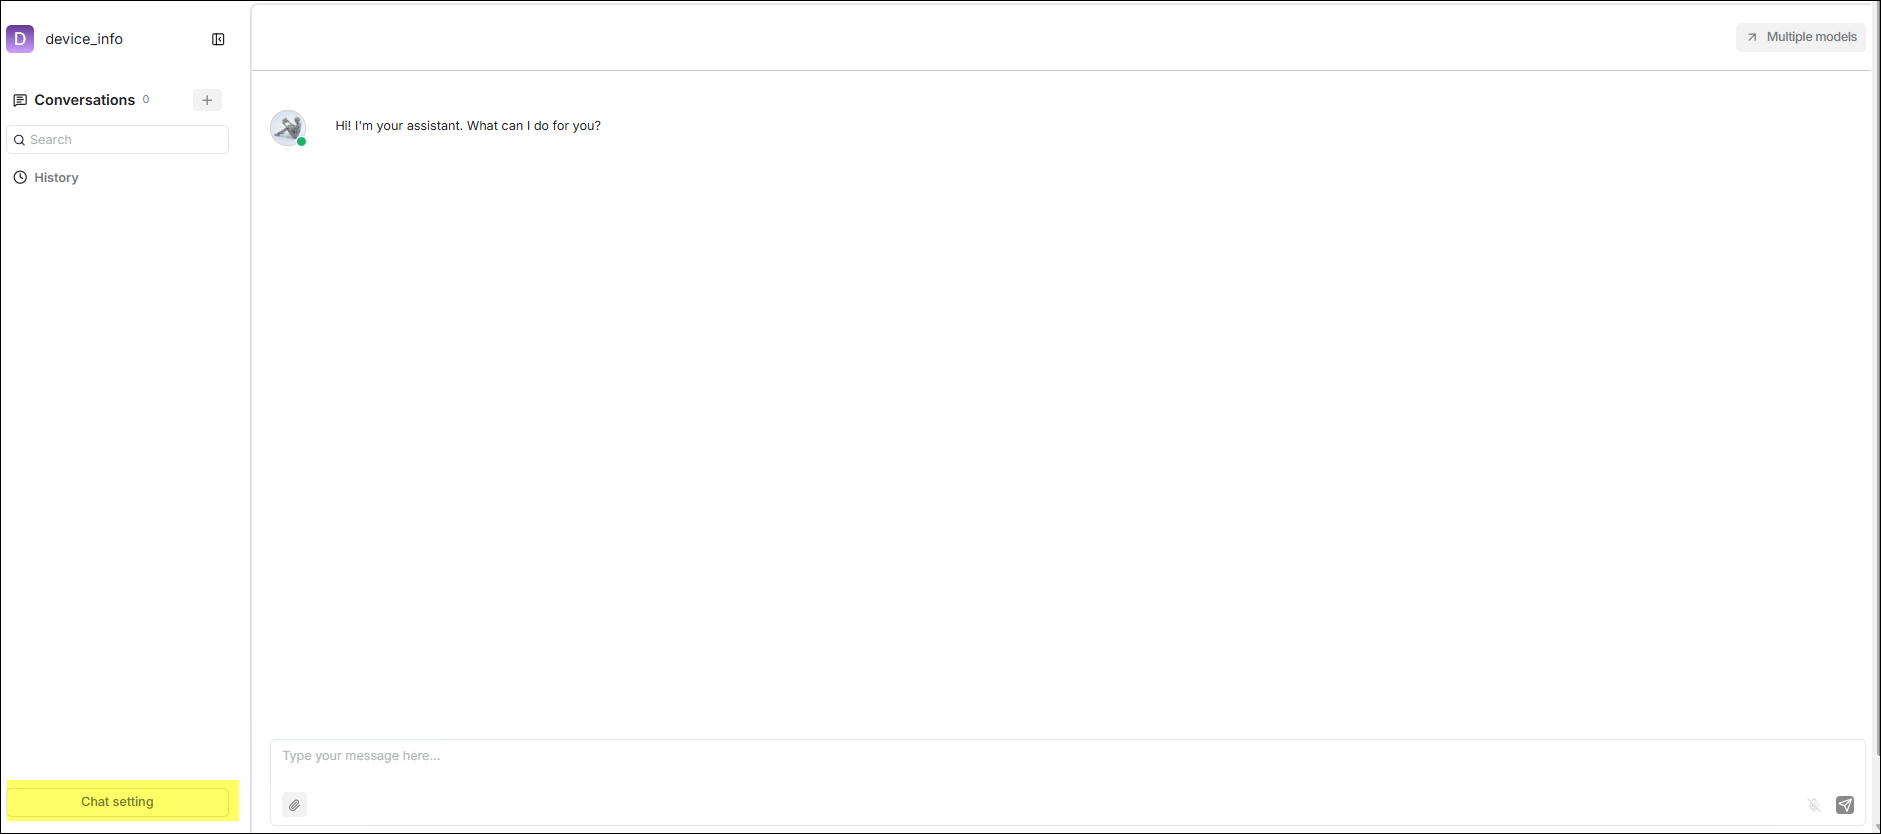
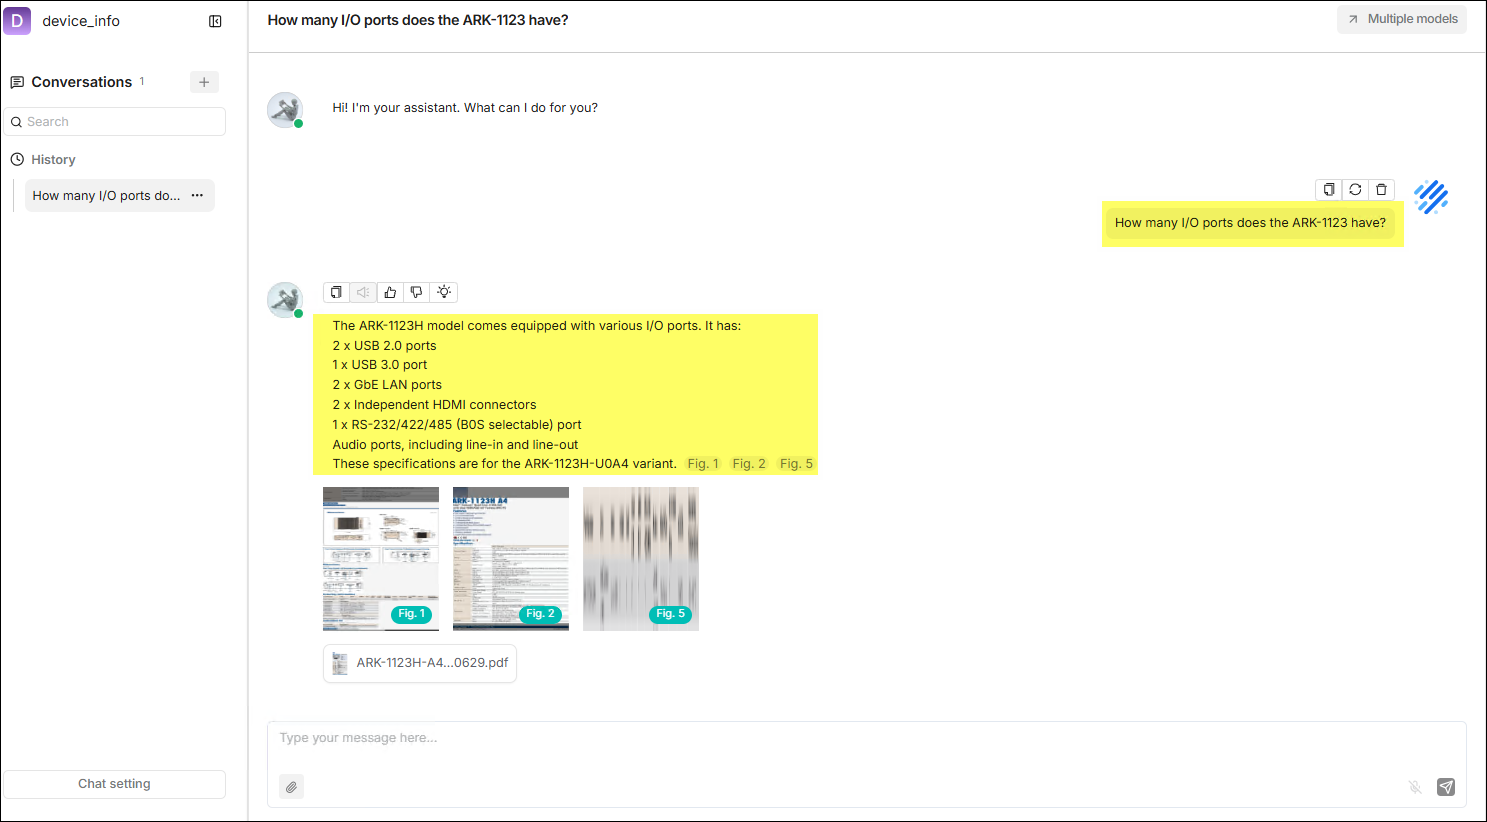
The following figure demonstrates an actual use case.
User Guide
Dataset
The dataset is the core data container of RAGFlow. Each dataset can contain
multiple documents. After the documents are uploaded, they undergo automatic
parsing, chunking, and vectorization, and can ultimately be cited by
intelligent retrieval and Q&A. The dataset list is shown below:

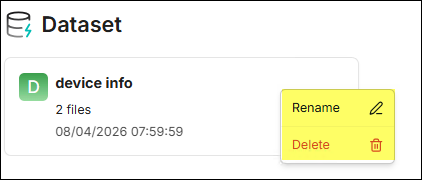
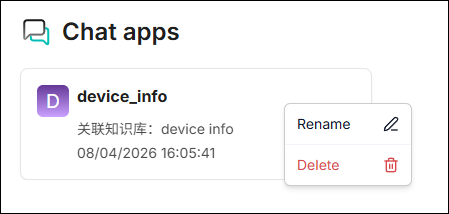
Click the "···" menu on the right side of the dataset card to execute the
Rename or Delete action.
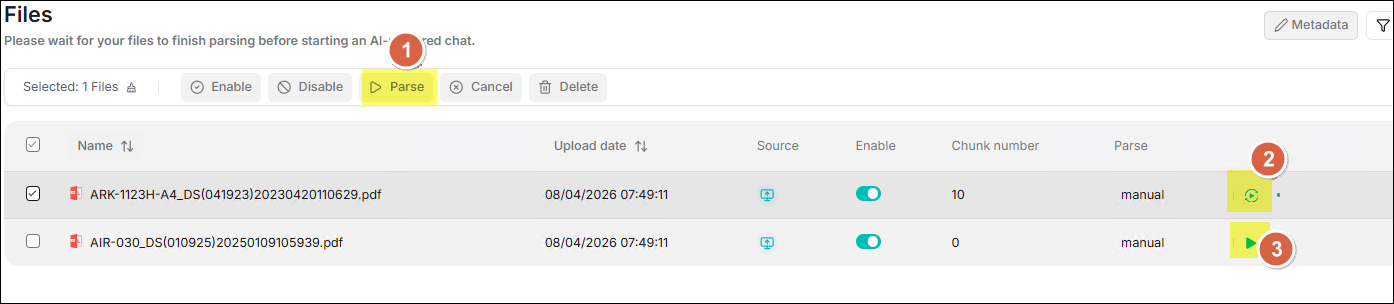
⚙️ Sidebar > Files
After entering the dataset, the Files in the sidebar is the main page for
managing documents within the dataset. It supports the upload of various file
formats, tracking of parsing status, and basic management. There are two ways
to operate on files, as shown in the figure below:

-
Select the checkbox to the left of the file you want to operate on to display batch operation functions.
- Enable: Enable selected files to participate in retrieval.
- Disable: Disable selected files, excluding them from the retrieval scope.
- Parse: Trigger the parsing task for selected files to generate content chunks.
- Cancel: Cancel ongoing parsing tasks.
- Delete: Permanently delete selected files; this operation is irreversible.
-
Hover your mouse over a file in the file list, and actionable Action buttons will appear on the right side of the row where the file is located.
- Edit: The
 icon,
used to rename the file.
icon,
used to rename the file. - View: The
 icon, used to
view information related to the file.
icon, used to
view information related to the file. - Download: The
 icon,
used to download the file.
icon,
used to download the file. - Delete: The
 icon,
used to delete the file.
icon,
used to delete the file.
- Edit: The
⛭ Upload File ⛭
Two methods are supported: File Link and File Upload.
-
File Link: The file system supports allowing multiple datasets to reference to the same file. In this mode, each dataset only saves a "reference" to the file without repeatedly copying the content. Therefore, when the source file changes, all datasets referencing this file will be updated synchronously. It is suitable for scenarios where multiple datasets need to reference the same file and want to maintain content consistency.
-
File Upload: Supports uploading files or folders from the local machine to the dataset. After uploading, the system saves a copy in that dataset, which means this file is independent of the original source or files in other datasets and does not affect each other. Even if the original file is modified or deleted, the file content in the current dataset will not change. It is suitable for scenarios requiring data isolation, independent versions, or avoiding mutual influence.
warningAlthough uploading files directly to a dataset seems more convenient, we strongly recommend that you first upload files to RAGFlow's file system and then link them to the target dataset. This avoids permanent deletion of files uploaded to the dataset.
⛭ Parse File ⛭
 Provides three methods for parsing files:
- Batch Files Parse: Check one or more files, then click the Parse button in the top toolbar to initiate a batch parsing task for the selected files.
- Reparse: Click the rotation icon located on the right side of the file to reparse that single file.
- Single File Parse: Click the play icon located on the right side of the file to perform the initial parsing for that single file.
⛭ Chunk Result ⛭
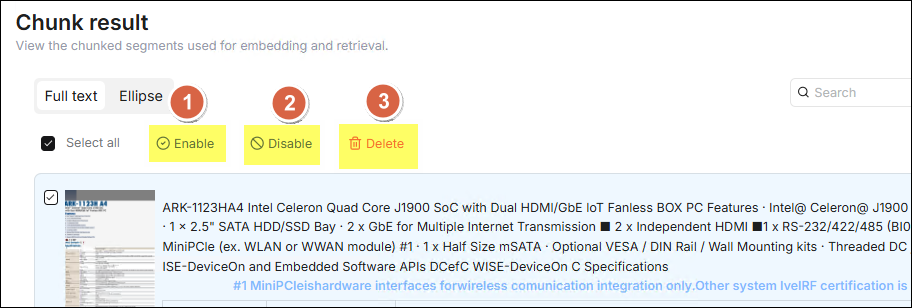 After the chunk parsing is completed, click the document to preview the
chunking result of the document and confirm the quality. Check the checkbox on
the left of the chunk row you want to operate on to perform relevant operations
on the checked chunk data:
After the chunk parsing is completed, click the document to preview the
chunking result of the document and confirm the quality. Check the checkbox on
the left of the chunk row you want to operate on to perform relevant operations
on the checked chunk data:
- Enable: Enable the selected chunks. Enabled chunks will participate in vectorization and retrieval, which is a prerequisite for normal retrieval.
- Disable: Disable the selected chunks. Disabled chunks will be excluded from retrieval, suitable for filtering invalid, duplicate, or low-quality chunk content.
- Delete: Permanently delete the selected chunks. This operation cannot be undone, please use it with caution.
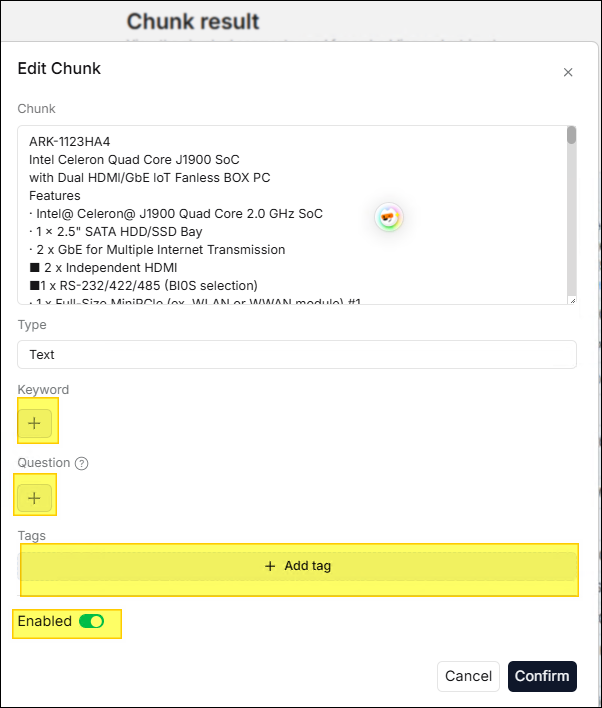
⛭ Edit Chunk ⛭
Double-click the chunk you want to edit with the mouse to open the edit window.
In the edit window, you can edit Keyword, Question, and Tags as
needed.
⚙️ Sidebar > Retrieval Testing
After files are uploaded and parsed, it is recommended to conduct a retrieval test before configuring the chat assistant. In the retrieval testing phase, the system will perform a hybrid search on the generated chunks based on your specified chunking method. The hybrid search combines "Weighted Keyword Similarity" with another type of semantic relevance score, specifically:
- When no rerank model is selected
Weighted Keyword Similarity + Weighted Vector Cosine Similarity. - When a rerank model is selected
Weighted Keyword Similarity + Weighted Rerank Score.
It is recommended to prepare 5–10 representative test questions covering major use cases, and have the system evaluate the hit rate before launching the chat assistant.
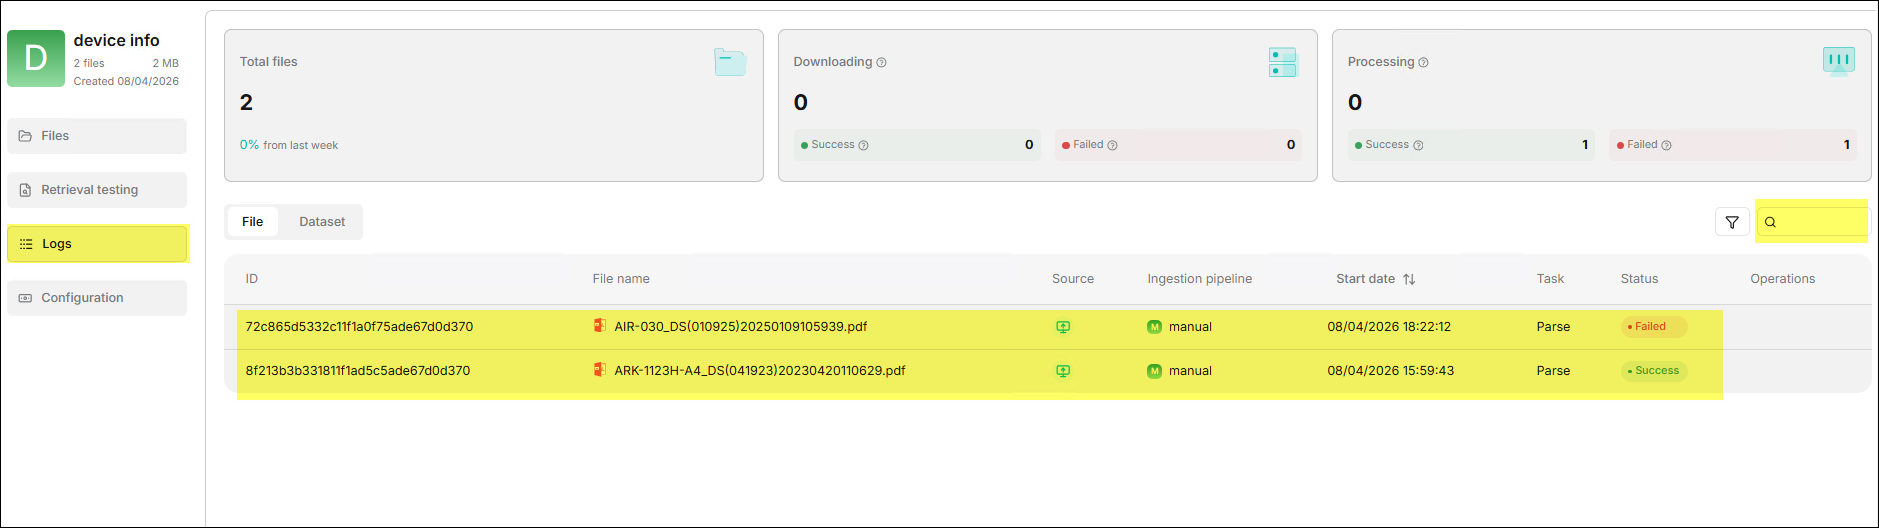
⚙️ Sidebar > Logs
The Logs feature records detailed logs of this dataset being called by
chat assistants, helping administrators track retrieval behavior in actual use.
⚙️ Sidebar > Configuration
Configuration is the most critical setting center of the dataset, directly determining document parsing quality and retrieval effects. It is recommended to complete the configuration before uploading documents for the first time. The parameters for related settings are explained below:
⛭ Basic ⛭
| Field | Required | Description |
|---|---|---|
| Name | Yes | Template name, used for display and retrieval in the template list. |
| Avatar | No | Template avatar/icon, for quick identification in the list. |
| Description | No | Explanation of template purpose, recommended to describe applicable document types and target scenarios. |
| Embedding model | Yes | The default embedding model used by this template, affecting vectorization quality and retrieval effects. |
| Page rank | No | Page sorting weight, used to control the display order of templates in the list (higher values are ranked higher). |
| Tag sets | No | A collection of template tags, used for classifying, filtering, and batch managing templates. |
⛭ Ingestion pipeline ⛭
| Field | Required | Description |
|---|---|---|
| Parse type | Yes | Parsing type, used to specify the implementation of chunking and parsing workflows. |
| Chunking Method | Yes | Chunking method. Determines how documents are split into retrievable text chunks. |
| PDF parser | No | PDF parser. Used for processing PDF document structure and content extraction. |
| Auto metadata | No | Auto metadata extraction switch. Once enabled, you can enter Settings to configure metadata extraction rules. |
| Auto-keyword | No | Parameter for the number or intensity of auto-generated keywords. The higher the value, the more keywords are auto-generated. |
| Auto-question | No | Parameter for the number or intensity of auto-generated questions. The higher the value, the more questions are auto-generated. |
Options in the Chunking method field are described as follows:
| Name | Description | Supported File Types |
|---|---|---|
| General | Continuously chunks files based on the default chunk token count. | MD, MDX, DOCX, XLSX, XLS (Excel 97-2003), PPT, PDF, TXT, JPEG, JPG, PNG, TIF, GIF, CSV, JSON, EML, HTML |
| Q&A | Retrieves relevant information and generates answers in response to questions. | XLSX, XLS (Excel 97-2003), CSV/TXT |
| Resume | An enterprise-exclusive feature, also available to experience on cloud.ragflow.io. | DOCX, PDF, TXT |
| Manual | ||
| Table | Table mode using TSI technology for highly efficient data parsing. | XLSX, XLS (Excel 97-2003), CSV/TXT |
| Paper | ||
| Book | DOCX, PDF, TXT | |
| Laws | DOCX, PDF, TXT | |
| Presentation | PDF, PPTX | |
| One | Each document is a single chunk and is not split. | DOCX, XLSX, XLS (Excel 97-2003), PDF, TXT |
| Tag | This dataset is used as a tag set for other datasets. | XLSX, CSV/TXT |
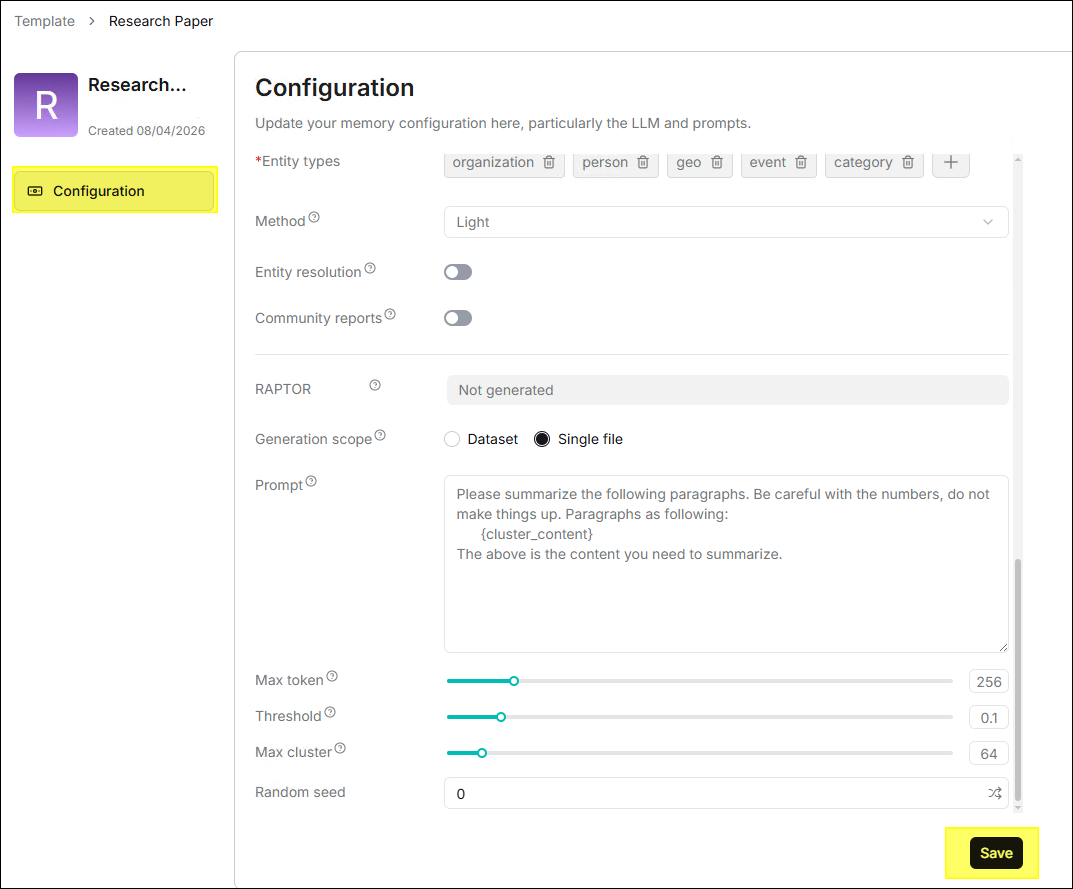
⛭ Global index ⛭
| Field | Required | Description |
|---|---|---|
| Indexing model | Yes | Global index model, used for knowledge graph extraction and index construction. |
| Knowledge graph | No | Knowledge graph generation status. Displays Not generated when not generated. |
| Entity types | Yes | Entity type collection, defining target entity categories for extraction, supports Add/Delete. |
| Method | No | Graph construction method, affecting index construction speed and effect. |
| Entity resolution | No | Entity disambiguation switch. Merges identically named/synonymous entities to reduce duplicates when enabled. |
| Community reports | No | Community report switch. Generates community-level summaries/analysis results when enabled. |
| RAPTOR | No | RAPTOR generation status. Displays Not generated when not generated. |
| Generation scope | Yes | Generation scope, generated by the entire dataset or by a single file. |
| Prompt | No | RAPTOR summary prompt template, used to constrain summary content and style. |
| Max token | No | Max output tokens for summary generation. The larger the value, the longer the summary can be. |
| Threshold | No | Clustering threshold parameter, affecting clustering granularity. |
| Max cluster | No | Upper limit for max clusters, used to control clustering scale. |
| Random seed | No | Random seed, used to improve the reproducibility of generation results. |
Chat
The Chat is the main interface for users to interact with the dataset daily. Each chat is associated with one or more datasets. Users ask questions in natural language, and the system retrieves the dataset based on the RAG process and generates answers by the LLM, accompanied by source references.
⚙️ Create Chat
A chat assistant represents a specific Q&A scenario (e.g., "HR Policy Assistant", "Product Manual Assistant"). Different assistants can be bound to different datasets and model configurations.
- Enter Chat List Page: Click Chat in the top middle menu of the page to enter the chat assistant list page.
- Create Chat: Click the ✚ button to pop up the Create chat dialog box.
- Fill in Information: Enter the Name and select the Datasets.
- Save and Enable: Click Save after completion. The assistant appears
in the chat list, click it to start a conversation.
⚙️ Chat Management
Click the "···" menu on the right side of the chat card to execute the
Rename or Delete function.
⚙️ Chat Settings
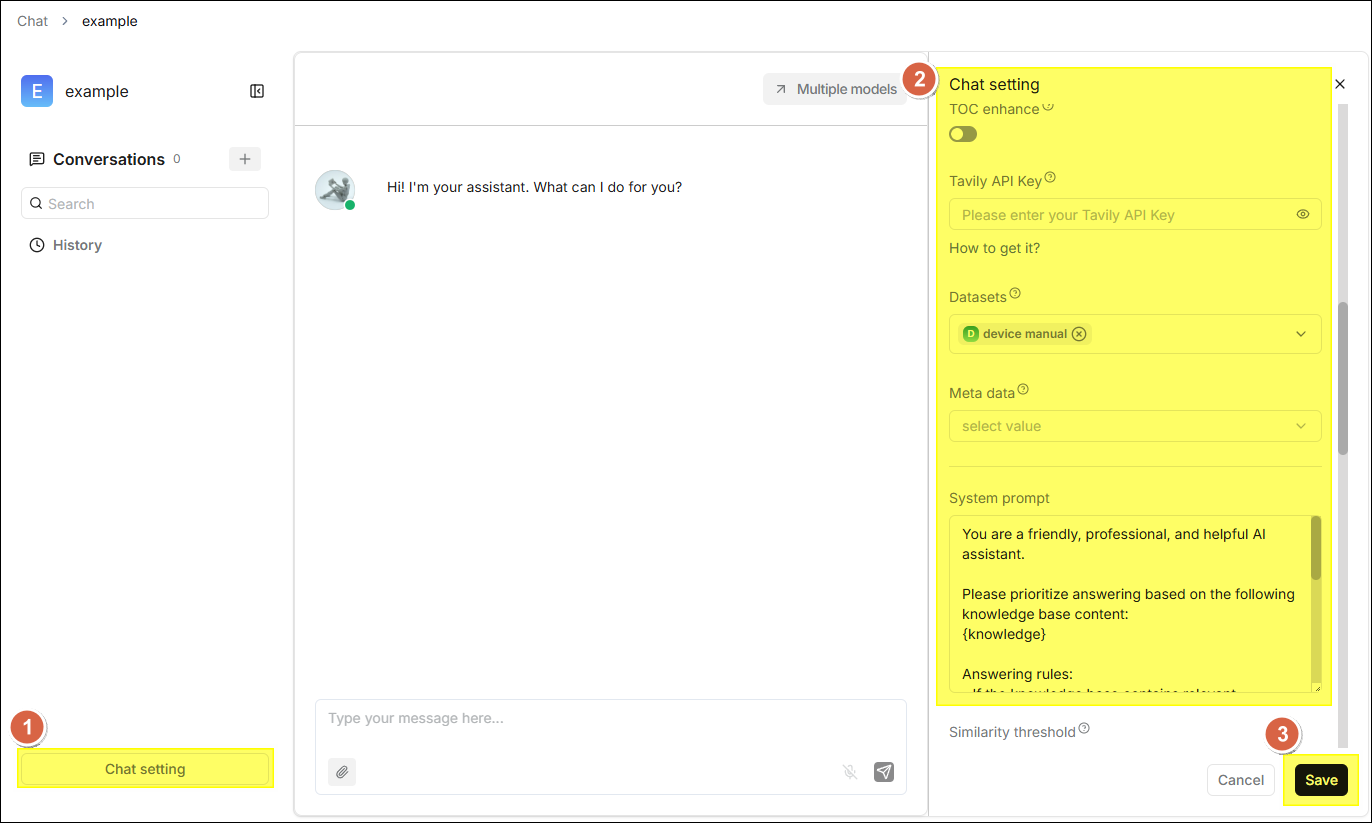
After clicking the chat card to enter the chat page, you can click Chat setting at the bottom left. Detailed configurations will appear on the right side of the page, where you can adjust the following settings:
| Field | Description |
|---|---|
| Assistant avatar | Set the avatar icon for the chat assistant, displayed in the conversation interface. |
| Assistant name | The display name of the chat assistant. |
| Description of assistant | A brief explanation of the assistant's purpose, helping users understand its applicable scenarios. |
| Empty response | A fixed response when no relevant content is retrieved in the knowledge base. If left blank, the LLM will answer based on its own knowledge, which may cause hallucinations. |
| Opening greeting | A welcome message displayed to the user by the assistant when the conversation begins. |
| Show quote | Once enabled, displays quoted original document snippets and sources in the response, enhancing answer credibility. |
| Keyword analysis | When enabled, the LLM performs keyword extraction on user questions, strengthening relevance calculation. |
| Text to speech | Once enabled, converts the response content into voice playback; requires prior configuration of a TTS model. |
| TOC enhance | When generating document TOC (Table of Contents) information during parsing, enabling this item can optimize retrieval logic. |
| Tavily API Key | After filling in the API Key, the system will overlay Tavily web search on top of knowledge base retrieval. |
| Datasets | Select the associated knowledge bases, multiple selections supported. |
| System prompt | Define the assistant's role, response scope, and tone. Note: {knowledge} is a predefined variable. |
| Similarity threshold | The filtering threshold for hybrid similarity (0-1). Text chunks below this threshold will be discarded. |
| Vector similarity weight | The weight of vector cosine similarity in hybrid similarity. |
| Top N | When exceeding the similarity threshold, only the top N ranked results are used as context. |
| Multi-turn optimization | Rewrites and optimizes query questions based on context during multi-turn conversations, improving retrieval accuracy. |
| Use knowledge graph | Retrieves the corresponding knowledge graph when enabled, suitable for handling complex multi-hop questions; significantly extends retrieval time. |
| Reasoning | Enables the reasoning workflow, enhancing multi-step logical reasoning capabilities. |
| Rerank model | Performs secondary scoring and ranking on initial retrieval results, improving recall quality. |
| Cross-languang search | Select a target language, and the system will translate the query before performing cross-lingual retrieval. |
| Variable | Variable settings to dynamically adjust system prompts. |
| Model | Select the Large Language Model used to generate responses (Required). |
| Creativity | Default modes are "Precise", "Balanced", "Improvise", and "Custom". |
| Temperature | Controls the randomness of outputs; lower values yield more conservative answers, higher values yield more creative ones. |
| Top P | Nucleus sampling parameter, recommended to keep the default value of 0.3. |
| Presence penalty | Prevents the model from repeating the same content. |
| Frequency penalty | Reduces the model's tendency to frequently repeat the same vocabulary. |
| Max tokens | The maximum number of output Tokens allowed in a single response. |
The Empty response is essential. If not set, when there is no matching content in the dataset, the LLM may "make up" an answer based on its own knowledge. It is recommended to explicitly configure this option to ensure response reliability.
⚙️ Chat History
The system automatically saves all conversation sessions within the same chat
assistant, making it easy to view and resume previous conversations at any time:
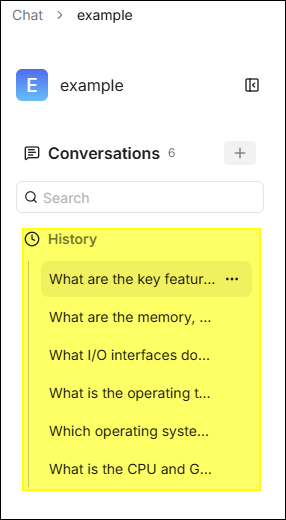
- Historical Session List: After entering a chat assistant, the left sidebar displays the assistant's historical session list, sorted in reverse chronological order.
- Resume Conversation: Click a historical session to reload the complete conversation context and continue asking questions based on it.
- New Session: Click the ✚ next to Conversations to start a new conversation, unaffected by historical context.
- Delete Session: Hover your mouse over the session title, click the "..." icon on the right, and then click the trash can icon to delete.
⚙️ Multiple Models
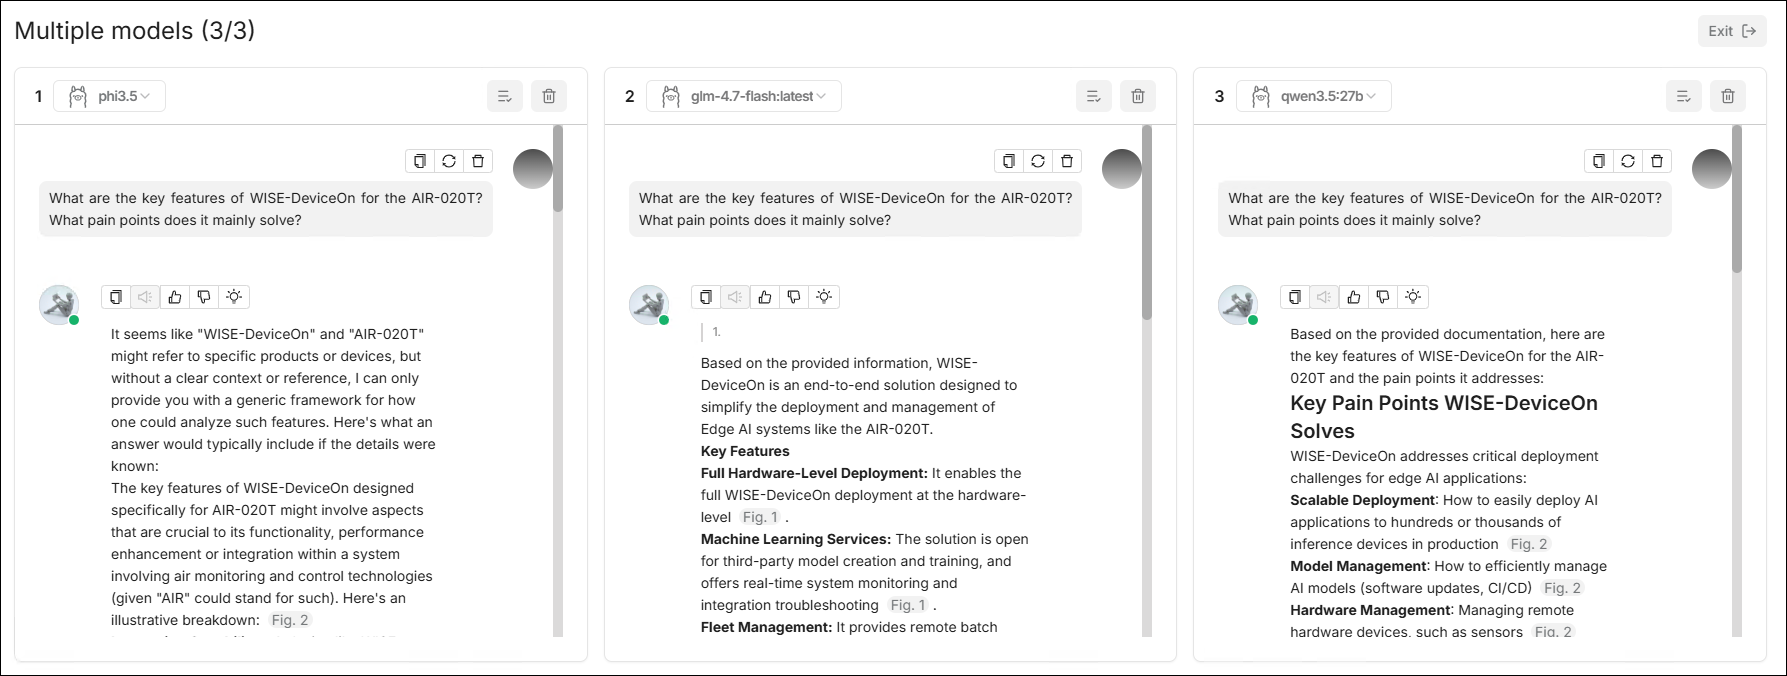
When a user needs to simultaneously get answers from multiple models for the same question and compare them, the Multiple models feature can be used. This feature supports configuring up to 3 panes within the same interface, where each pane can independently select a model and display output results separately.
-
Core Capabilities
- Multi-Pane Parallel Chat: One page simultaneously displays multiple model conversation areas.
- Independent Model Selection: Each pane can switch models individually.
- Pane Management: Supports executing operations like delete on a single pane.
- Unified Input Area: Unified message input at the bottom, send it once to observe response differences across multiple models.
-
Typical Use-Cases
- Compare the response quality of different models on the same professional question.
- A/B test prompt effects or parameter settings.
- Select the most suitable default model before launch.
Templates
Templates is a dataset shortcut configuration feature we developed. Its goal is to provide users with a set of pre-configured parameters that can be used directly when creating a new dataset.
⚙️ Purpose and Description
After users enter the Templates page, there are 4 built-in templates listed:
- Research Paper
- FAQ
- General Knowledge
- Technical Manual
Each template displays the Name, Tags, Brief Description, and Update Time, described as follows:
| Template Name | Applicable Scenarios | Recommended File Types | Features |
|---|---|---|---|
| Research Paper | Academic papers, research report interpretation | PDF (Papers) | Chunked according to paper structure and chapters. |
| FAQ | Q&A bases/Customer service knowledge bases | Excel / CSV / TXT | Optimized for Q&A structures. |
| General Knowledge | General corporate knowledge, training materials | Multi-format | General-purpose template, broadest application. |
| Technical Manual | Equipment manuals, operation manuals | PDF (Manuals) | Chunked according to manual hierarchy and chapters. |
The value of these four templates lies in being "out-of-the-box". Users can quickly get better initial retrieval results without understanding all the underlying parameters.
⚙️ Template Details
Users can view the detailed information of each template and adjust parameters according to actual needs before saving. The steps are as follows:
- Enter the Templates page.
- Click the ⓘ icon in the upper right corner of any template card, and a detailed information panel for the template will pop up for viewing.
⚙️ Modify Template
- Click any template card to open the configuration page and adjust parameters such as name, description, tags, embedding model, parser, etc.
- Click Save, and the modified parameters take effect immediately.
It is recommended to use the system default template to create the first dataset; when actual Q&A data is accumulated, gradually fine-tune it based on hit results.
File
File is used to centrally manage original files in the platform. Uploading files first and then linking them to target datasets can significantly improve reuse efficiency.
⚙️ File Management and Dataset Association
The system supports uploading files individually or in batches and linking uploaded files to one or more target datasets. This method is particularly suitable for the following scenarios:
- The same original file needs to be reused by multiple datasets.
- Some parsed files need to be deleted, but the original file still needs to be kept.
- Need to search, move, or rename files in a unified directory.
⚙️ Create Folder
File management supports creating nested folder structures. The steps to create
a folder in the root directory are explained below:
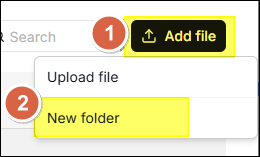
- On the File page, click Add file in the upper right corner.
- Select New folder from the dropdown menu.
- Enter the folder name in the Name field in the dialog window.
- Click Save.
Each dataset has a corresponding folder under root/.knowledgebase. It is
not allowed to create subfolders within the folder of that dataset.
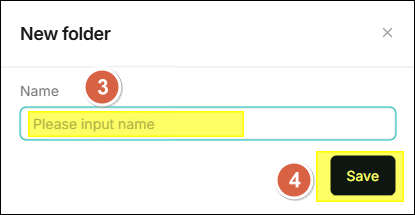
⚙️ Upload File
- Click Add file > Upload file in the upper right corner.
- Drag and drop files in the dialog window or click to select local files.
- Click Save.
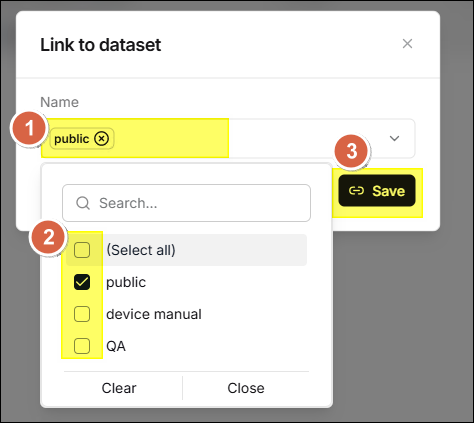
⚙️ Link Files to Dataset
Uploaded files can be linked to one or more datasets, and the system will create a reference to the file in the target dataset.
- Hover your mouse over the file row, and several icons will appear in the
action area on the right side of the row. Click the
 icon.
icon. - Select a dataset and click Save to link.
- When deleting the file, references in all associated datasets will be automatically removed.
⚙️ Preview File
Supports online preview of files in the following formats:
- DOCS
- XLSX
- JPEG
- JPG
- PNG
- TIF
- GIF
⚙️ Move File
Supports moving files to specified directories for easy management. Click the
![]() icon in the action area of
the file row and select the target folder.
icon in the action area of
the file row and select the target folder.

⚙️ Search File or Folder
The search box only supports filtering by file name or folder name in the current directory.
- It won't take files or folders in subdirectories into account.
- It is recommended to go to the target directory first before searching.
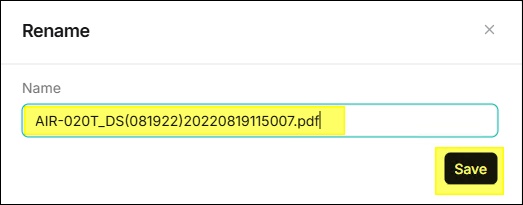
⚙️ Rename File or Folder
Supports renaming files and directories. Click the
![]() icon in the action area
and enter the new name.
icon in the action area
and enter the new name.
⚙️ Delete File or Folder
Supports individual deletion or batch deletion.
- Individual Delete: Click the
icon in the action area.
- Batch Delete: Check multiple files and execute delete collectively.
- The system does not allow the deletion of the root directory
root/.knowledgebase. - When a file linked to a dataset is deleted, references in all datasets will be removed synchronously.
⚙️ File Download
Click ![]() icon can
download that file。
icon can
download that file。
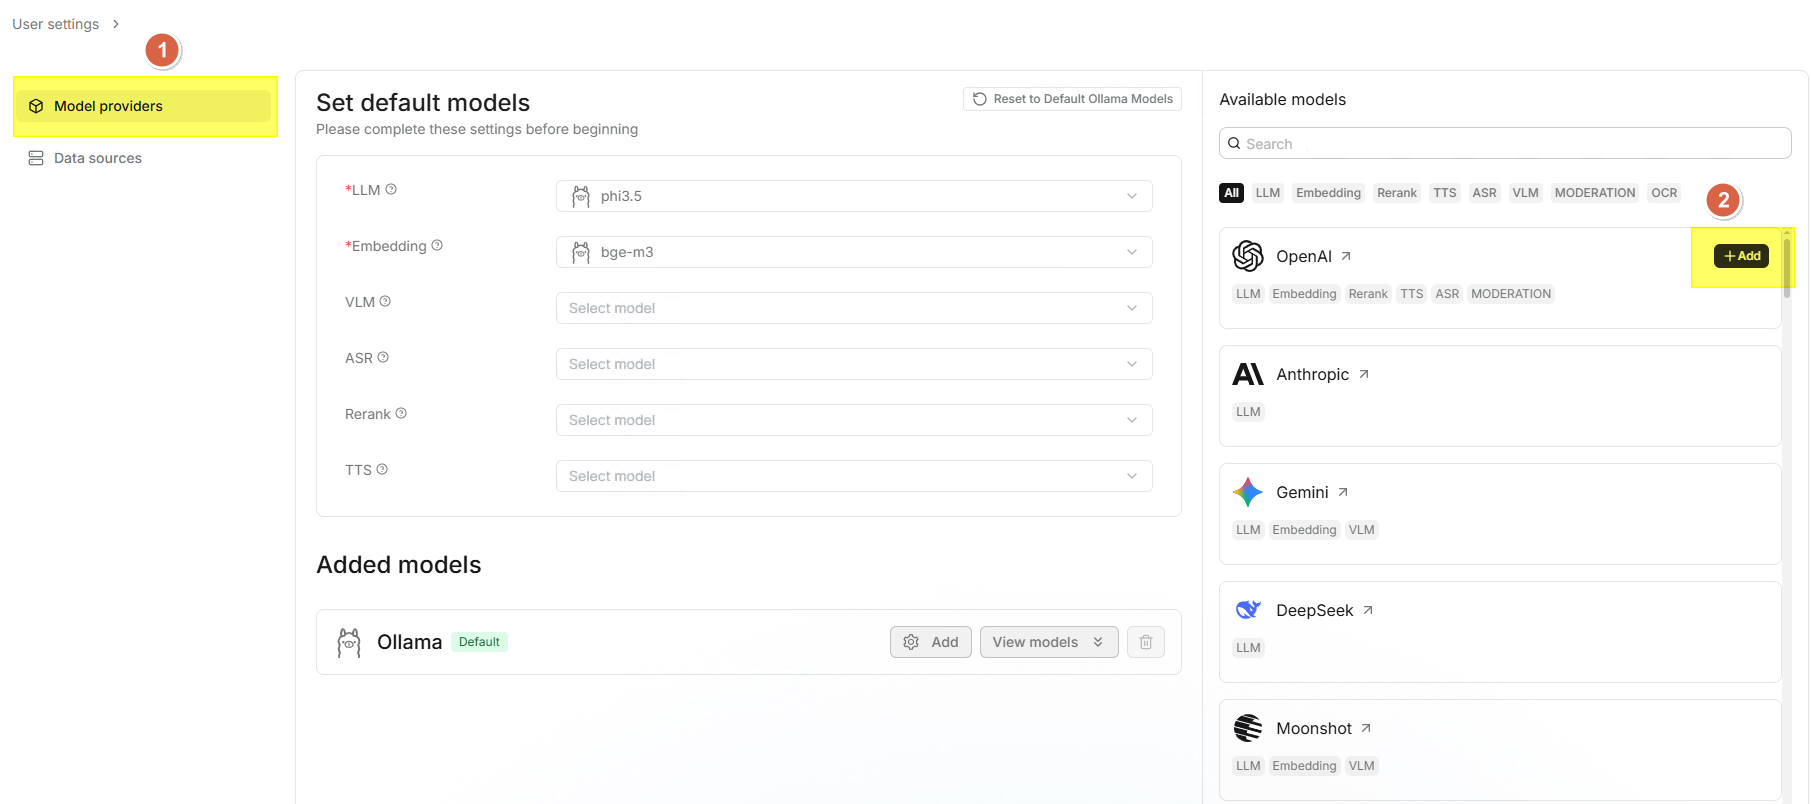
Model Providers
Model providers is used to manage various AI models (LLM, Embedding, Reranker, VLM, ASR, TTS).
⚙️ Set Default Model
RAGFlow supports setting system defaults for different model types. Newly
created datasets and chat assistants will automatically use these default
models.
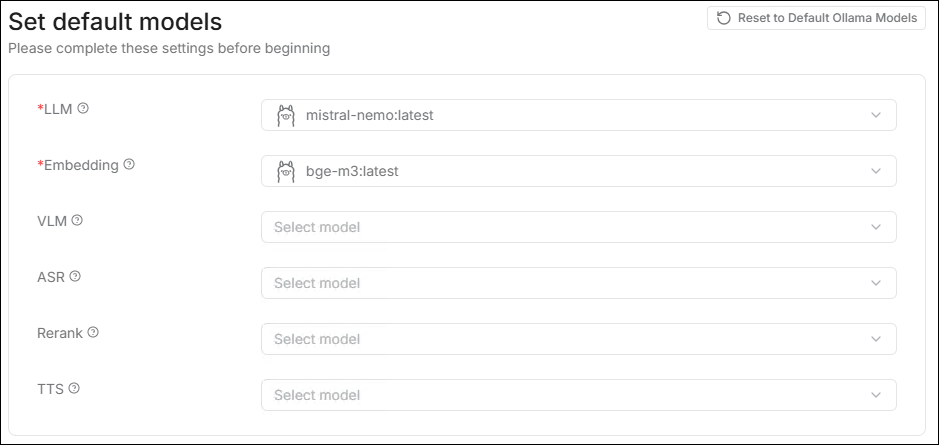
- LLM: The primary model for chatting.
- Embedding: Responsible for vectorization, determining retrieval accuracy.
- VLM: Used to understand image content.
- ASR: Speech to text.
- Rerank: Improves retrieval ranking quality.
- TTS: Text to speech.
If data already exists in the system, changing the default Embedding model is a high-risk operation. Once confirmed, it will clear all generated vector data and remove uploaded files from the dataset.
⚙️ Model Providers
Supports a variety of mainstream models and providers and can deploy local models via Ollama / LocalAI.
| Provider | Supported Types |
|---|---|
| OpenAI | LLM (GPT-4o, GPT-4, GPT-3.5, etc.), Embedding (text-embedding-3-small/large) |
| DeepSeek | LLM (DeepSeek-V3, DeepSeek-R1, etc.), Embedding |
| Qwen | LLM (Qwen-Max, Qwen-Plus, etc.), Embedding (text-embedding-v3) |
| Zhipu AI | LLM (GLM-4, etc.), Embedding (embedding-3) |
| Baidu | LLM (ERNIE Series), Embedding |
| Ollama | All local models managed by Ollama (Llama 3, Qwen2, Mistral, etc.) |
| NVIDIA NIM | Supports enterprise-grade model inference accelerated by NVIDIA GPUs |
| Hugging Face | Supports connecting open-source models on the platform via API |
⚙️ Model Synchronization
- When entering the Set default models page for the first time, the system
will automatically synchronize the Ollama models already pulled in GenAI Studio.
- If the LLM and Embedding model currently used by GenAI Studio are provided by Ollama, the system will also synchronize the corresponding Ollama configuration.
- Click Reset to Default Ollama Models in the upper right corner to
restore to the default configuration identical to GenAI Studio.
- The Reset to Default Ollama Models button will only be enabled when both the current LLM and Embedding of GenAI Studio use Ollama; otherwise, the button is only displayed but unclickable.
- If you modify the Embedding settings and click Reset to Default Ollama Models, the system will clear all generated vector data and uploaded files in the dataset.
⚙️ Add Model
- Click the gear icon at the top of the page.

- Find the provider you want to configure (e.g., OpenAI, DeepSeek, etc.) in
the provider cards on the right side of the page and click the card.
- Enter the API-Key (required), some providers require filling in the
Base-Url.
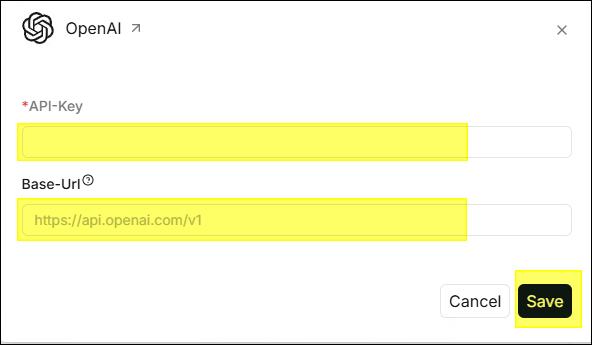
- After clicking Save, the configuration will appear in the Added models
section below.
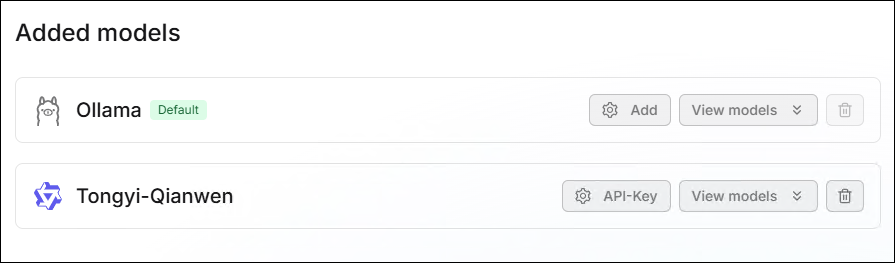
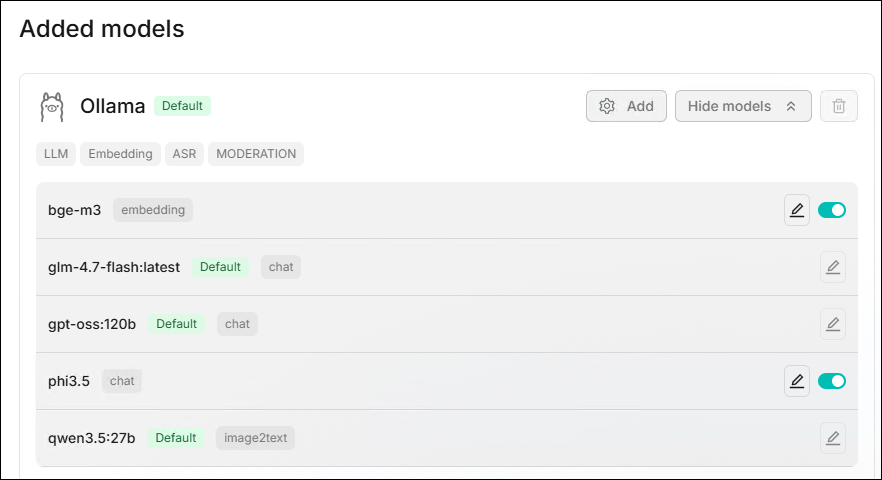
⚙️ Model Management
Models can be managed in the Added models section, supporting Delete,
Edit, and Enable/Disable operations.
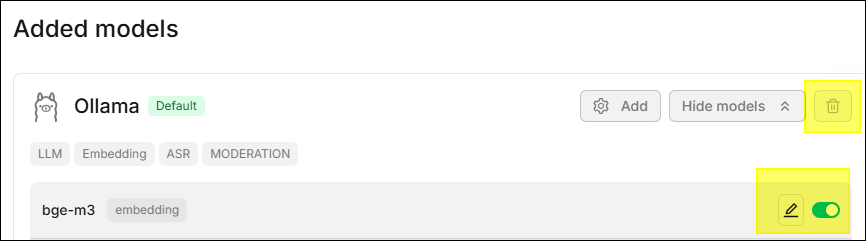
- Delete: Click the icon to
delete. If the model is still used by a dataset or chat assistant, it must1
be unbound first.
- Edit: Click the icon to
edit model settings.
- Enable/Disable: Click the toggle on the right side of the model to enable or disable the model.
⚙️ Data Sources
Data sources allows the system to synchronize data with existing enterprise
data without manual upload. Currently supported data sources include:
Confluence, Google Drive, GitHub, GitLab, Discord, Jira, WebDAV, IMAP, etc.
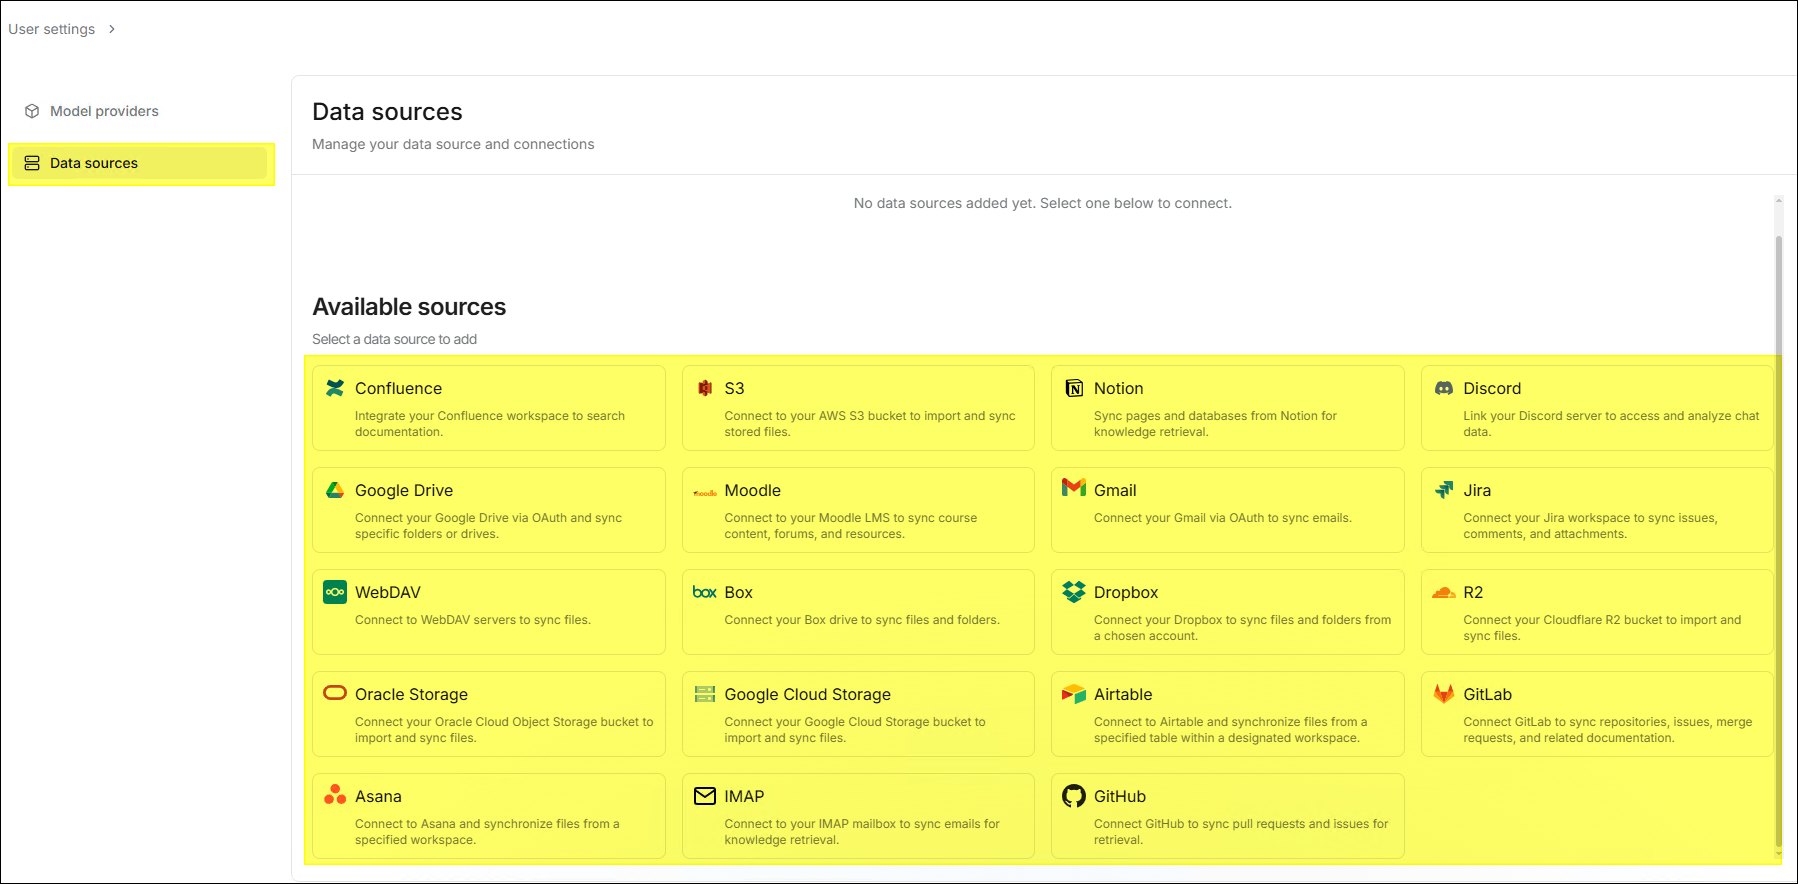
- The information required for different data sources varies. Configure them according to your selected data source.
- For data sources that require a token for access, it is strongly recommended to use a dedicated token and follow the principle of least privilege.
Note
Roles and Permissions
RAGFlow's permission management is identical to GenAI Studio, supporting tiered management of user roles and the ability to configure permissions for different roles.
| Function/Permission | Admin | Manager | Default |
|---|---|---|---|
| Edit System Settings | ✔️ | ❌ | ❌ |
| Edit System Templates | ✔️ | ❌ | ❌ |
| Delete System Templates | ✔️ | ❌ | ❌ |
| Create Dataset | ✔️ | ✔️ | ❌ |
| Edit Dataset Settings | ✔️ | ✔️ | ❌ |
| View (Bind) Dataset | ✔️ | ✔️ | ❌ |
| Delete Dataset | ✔️ | ✔️ | ❌ |
| Create Chat | ✔️ | ✔️ | ❌ |
| Edit Chat Settings | ✔️ | ✔️ | ❌ |
| View (Use) Chat | ✔️ | ✔️ | ✔️ |
| Delete Chat | ✔️ | ✔️ | ❌ |
Dataset Formats
When uploading structured datasets, please adhere to the following formats and specifications to ensure parsing quality:
- CSV:
- Use UTF-8 encoding without BOM.
- The first row must be column names.
- Column names should avoid spaces and special characters.
- Use empty strings for empty fields.
- JSON:
- The outermost layer is a JSON array.
- Each array element is an object.
- Supports nested objects up to three levels deep.
- Column names can use English or Chinese without spaces.
- Excel (.xlsx):
- Data starts from A1 cell.
- The first row is column names.
- Avoid merged cells.
- Each sheet is processed separately.
FAQ
How to configure an unsupported LLM?
If your model is currently unsupported but has an API interface compatible with OpenAI, please select the OpenAI-API-Compatible in the Model providers settings page to configure your model.
How to improve chat speed?
Please note that certain settings may consume a significant amount of time. If you find that the model takes too long to answer questions during a chat, please refer to the following suggestions:
- Disable multi-turn optimization to reduce the time required to fetch answers from the model.
- Leaving the Rerank model setting blank can significantly reduce retrieval time.
- Disabling reasoning can shorten the model's thinking time. For models like
Qwen3, you also need to add the corresponding
/no_thinksetting in the system prompt to disable the reasoning feature. - When using a rerank model, make sure you have a GPU for acceleration; otherwise, the reranking process will be very slow.
- Disabling keyword analysis can shorten the time to receive model responses.
What is the difference between AI Search and AI Chat?
- AI Search: Is a single-turn AI conversation using predefined retrieval strategies (a hybrid search of weighted keyword similarity and weighted vector similarity) and the system's default chat model. It does not involve advanced RAG strategies such as knowledge graphs, auto-keywords, or auto-questions. Retrieved information will be listed below the chat model's response.
- AI Chat: Is a multi-turn AI conversation where you can define retrieval strategies (can use weighted rerank score instead of weighted vector similarity in hybrid search) and select chat models. In Chat, you can set up advanced RAG strategies specific to situations, such as knowledge graphs, auto-keywords, and auto-questions. Retrieved information will not be displayed with the answers. When configuring chat assistants, AI Search can be used as a reference to verify model settings and retrieval strategies.
Why does the file parsing progress always stall below 1%?
Click the red cross next to the Parsing Status, then restart it and check if the problem persists. If it still does, please check the related log contents to see if there are any anomalies.