Installation
Before installing GenAI Studio, please prepare the hardware configuration and install the operating system as listed in the Prerequisites, then proceed with the installation of the following software in order.
Install NVIDIA GPU Driver
-
Open the terminal and execute the following commands to install the NVIDIA GPU driver.
sudo apt update
sudo apt install nvidia-driver-580-open -
Reboot the system.
sudo reboot -
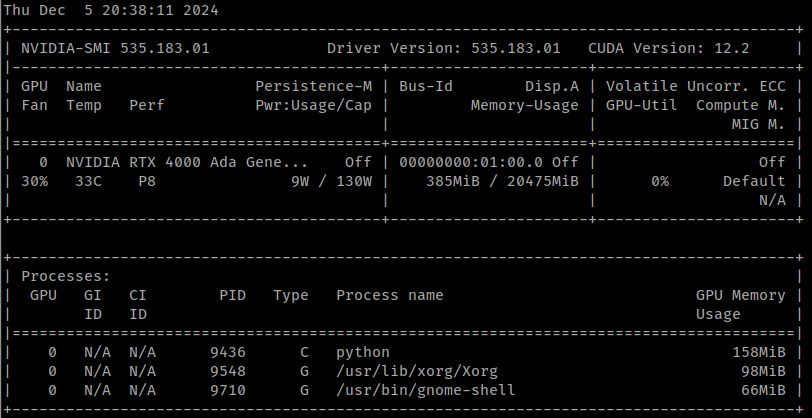
Verify the installation results.
nvidia-smiAt this point, the terminal window should output information regarding the NVIDIA GPU (it should look similar to the image below, but the content will be different).
Install CUDA
In the terminal, execute the following commands to install CUDA 13.0.
wget https://developer.download.nvidia.com/compute/cuda/repos/debian12/x86_64/cuda-keyring_1.1-1_all.deb
sudo dpkg -i cuda-keyring_1.1-1_all.deb
sudo apt update
sudo apt install -y cuda-toolkit-13-0
AI SSD Configuration
Since the Full Parameter Fine-tuning feature relies on the AI SSD hardware configuration, the AI SSD setup is indispensable if you wish to use this feature. For environments that do not require or need this feature, please skip this section.
The configuration of the AI SSD depends on how many AI SSDs are available on the host. When there is more than one AI SSD in the host, it must be configured using LVM; however, if there is only one, it can be configured just like a general disk.
Multiple AI SSD Setup
-
Install LVM packages
sudo apt update
sudo apt install lvm2 xfsprogs -
Confirm the AI SSD mount path
lshw -class disk -class storage | grep -E 'ai100|logical name|version: EIFZ'
lsblk | grep nvmeinfoConfirm whether the AI SSD device names are
nvme0n1andnvme1n1, etc. If not, please make necessary modifications to the relevant commands in the subsequent steps according to your actual environment. -
Wipe disks (just in case)
sudo wipefs -a /dev/nvme0n1 /dev/nvme1n1 -
Create LVM
sudo pvcreate /dev/nvme0n1 /dev/nvme1n1
sudo vgcreate ai /dev/nvme0n1 /dev/nvme1n1
sudo lvcreate --type striped -i 2 -I 128k -l 100%FREE -n ai ai -
Format LVM
sudo mkfs.xfs -f -s size=4k -m crc=0 /dev/ai/ai -f -
Mount LVM
sudo mkdir -p /mnt/nvme0
sudo mount /dev/ai/ai /mnt/nvme0
sudo chown -R $USER:$USER /mnt/nvme0warningThe
/mnt/nvme0in the above command is a fixed mount point; GenAI Studio monitors AI SSD usage based on this mount point. -
Persist the mount
echo '/dev/ai/ai /mnt/nvme0 xfs defaults,nofail 0 0' | sudo tee -a /etc/fstabinfoTo remove the permanent mount setting, execute:
sudo sed -i '/\/dev\/ai\/ai/d' /etc/fstab
If the LVM setup is successful, you should see a message similar to the image
below when executing the lsblk command.

If you need to remove the LVM configuration, please execute the following commands:
sudo umount /mnt/nvme0
sudo lvremove -y ai
sudo pvremove -y /dev/nvme0n1 /dev/nvme1n1 --force --force
Single AI SSD Setup
If there is only one AI SSD configured on the host, the setup is much simpler. Please follow the steps below.
-
Format AI SSD
sudo mkfs -t ext4 /dev/nvme0n1 -
Mount AI SSD
sudo mkdir -p /mnt/nvme0
sudo mount /dev/nvme0n1 /mnt/nvme0
sudo chown -R $USER:$USER /mnt/nvme0warningThe
/mnt/nvme0in the above command is a fixed mount point; GenAI Studio monitors AI SSD usage based on this mount point. -
Persist the mount
echo '/dev/nvme0n1 /mnt/nvme0 ext4 defaults,nofail 0 0' | sudo tee -a /etc/fstabinfoTo remove the permanent mount setting, execute:
sudo sed -i '/\/dev\/nvme0n1/d' /etc/fstab
Configure swap file
Enabling a swap file can provide additional memory for the DRAM. If GPU memory is still sufficient, this can extend the range of usable batch sizes. Please follow the steps below to configure it.
-
Create swap file
sudo dd if=/dev/zero of=/mnt/nvme0/swapfile bs=1M count=256k -
Modify permissions
sudo chmod 0600 /mnt/nvme0/swapfile -
Initialize
sudo mkswap /mnt/nvme0/swapfile -
Enable swap file
sudo swapon /mnt/nvme0/swapfile -
Persist swap file
echo '/mnt/nvme0/swapfile none swap sw 0 0' | sudo tee -a /etc/fstab
If you want to remove the swap file, please ensure you follow the steps below to prevent unexpected system issues.
sudo swapoff /mnt/nvme0/swapfile
sudo sed -i '/\/mnt\/nvme0\/swapfile/d' /etc/fstab
sudo rm /mnt/nvme0/swapfile
Install Docker
-
Execute the following commands to uninstall all packages that may cause conflicts:
for pkg in docker.io docker-doc docker-compose docker-compose-v2 podman-docker containerd runc; do sudo apt-get remove $pkg; doneapt-getmight report that you do not have these packages installed. -
Set up Docker's apt repository.
# Add Docker's official GPG key:
sudo apt-get update
sudo apt-get install ca-certificates curl
sudo install -m 0755 -d /etc/apt/keyrings
sudo curl -fsSL https://download.docker.com/linux/ubuntu/gpg -o /etc/apt/keyrings/docker.asc
sudo chmod a+r /etc/apt/keyrings/docker.asc

# Add the repository to apt sources:
echo "deb [arch=$(dpkg --print-architecture) signed-by=/etc/apt/keyrings/docker.asc] https://download.docker.com/linux/ubuntu $(. /etc/os-release && echo "$VERSION_CODENAME") stable" | \
sudo tee /etc/apt/sources.list.d/docker.list > /dev/null
sudo apt-get update -
Install Docker-related packages.
sudo apt-get install docker-ce docker-ce-cli containerd.io docker-buildx-plugin docker-compose-plugin -
Add user to the
dockergroup.sudo usermod -aG docker "$(id -un)" -
Verify the installation.
docker run hello-worldThis command downloads a test image and runs it in a container. When the container runs, it prints a confirmation message and exits.
Install NVIDIA Container Toolkit
-
Configure the apt repository.
curl -fsSL https://nvidia.github.io/libnvidia-container/gpgkey \
   | sudo gpg --dearmor -o /usr/share/keyrings/nvidia-container-toolkit-keyring.gpg \
  && curl -s -L https://nvidia.github.io/libnvidia-container/stable/deb/nvidia-container-toolkit.list \
   | sed 's#deb https://#deb [signed-by=/usr/share/keyrings/nvidia-container-toolkit-keyring.gpg] https://#g' \
| sudo tee /etc/apt/sources.list.d/nvidia-container-toolkit.list -
Update the package list from the repository.
sudo apt-get update -
Install the NVIDIA Container Toolkit package.
sudo apt-get install -y nvidia-container-toolkit -
Use the
nvidia-ctkcommand to configure the container runtime environment.sudo nvidia-ctk runtime configure --runtime=docker -
Restart Docker service.
sudo systemctl restart docker
Install GenAI Studio
GenAI Studio provides an installer to allow users to install it easily. Typically, all you need to do is download it and then run it.
Before starting installation, please ensure there is sufficient disk space. As mentioned in the Storage Space content, to ensure GenAI Studio installs smoothly, we recommend having at least 186 GiB (approx. 200GB) of available disk space.
Please download the GenAI Studio installer from here.
The file name follows the format GenAI-Studio_<version>_setup.run. Copy the
installer to the host you want to install on, then simply execute the file in
the directory where the installer is located and answer relevant questions
during the process. The installer will then install GenAI Studio into the
Advantech/GenAI-Studio directory under the user home directory ($HOME).
Everything is just that simple and intuitive.
- If a command not found error occurs when running the installer,
please try executing it in the installer's directory using
./GenAI-Studio_<version>_setup.run. - If a Permission denied error occurs when running the installer,
please try executing
chmod 0755 GenAI-Studio_<version>_setup.runin the directory where the installer is located to grant execution permissions to the file before running it again.
Start GenAI Studio
If everything goes smoothly, GenAI Studio should be installed in the
$HOME/Advantech/GenAI-Studio directory. Execute the following commands
to start GenAI Studio.
cd ~/Advantech/GenAI-Studio/bin
./app-up
Since it is the first execution, GenAI Studio needs more time to perform system
initialization. After a maximum of about 1 minute, open a browser and point the
URL to the installation host with port 3001 to open the GenAI Studio portal.
Prior to GenAI Studio version v1.1.0, the installation path was $HOME/GenAI-Studio.